No edit summary |
|||
| Line 11: | Line 11: | ||
When the three sons divided the amulet amongst themselves, they immediately began a rampage around Skyrim. This attracted the attention of the High King Harald of Skyrim, which caused him to send his best warriors and his personal battlemage [[Geirmund's Hall|Lord Geirmund]]. |
When the three sons divided the amulet amongst themselves, they immediately began a rampage around Skyrim. This attracted the attention of the High King Harald of Skyrim, which caused him to send his best warriors and his personal battlemage [[Geirmund's Hall|Lord Geirmund]]. |
||
| − | A great chase ensued, from the wilds of the Reach to the glacial north. one brother is said to have perished in the ruins of [http://elderscrolls.wikia.com/wiki/Folgunthur Folgunthur], at the Foot of [http://elderscrolls.wikia.com/wiki/Solitude Solitude]. The others were run to ground soon thereafter. And once it was done, |
+ | A great chase ensued, from the wilds of the Reach to the glacial north. one brother is said to have perished in the ruins of [http://elderscrolls.wikia.com/wiki/Folgunthur Folgunthur], at the Foot of [http://elderscrolls.wikia.com/wiki/Solitude Solitude]. The others were run to ground soon thereafter. And once it was done, King Harald ordered every record of their murders destroyed, and Gauldur's name and deeds were struck from the rolls of history. |
==Objectives== |
==Objectives== |
||
Revision as of 03:14, 14 July 2013
This article or section is not written in the formal tone expected of an encyclopedia entry, meaning it relies heavily on colloquialisms and unprofessional verbiage. The perspective may be written from a first- or second- person point of view, when third person indirect is required. See the style sheet and the writing guideline for suggestions.
|

|
Background
"Long ago, the Archmage Gauldur was murdered by his three sons, who stole his amulet of power and divided it among themselves."
When the three sons divided the amulet amongst themselves, they immediately began a rampage around Skyrim. This attracted the attention of the High King Harald of Skyrim, which caused him to send his best warriors and his personal battlemage Lord Geirmund. A great chase ensued, from the wilds of the Reach to the glacial north. one brother is said to have perished in the ruins of Folgunthur, at the Foot of Solitude. The others were run to ground soon thereafter. And once it was done, King Harald ordered every record of their murders destroyed, and Gauldur's name and deeds were struck from the rolls of history.
Objectives
- Investigate the cryptic message
- Investigate the Gauldur legend
- Learn the truth from Daylas Valen
- Read Daynas Valen's notes
- Find the Gauldur Amulet fragment in Saarthal
- Find the Gauldur Amulet fragment in Folgunthur
- Find the Gauldur Amulet fragment in Geirmund's Hall
- Reforge the Gauldur Amulet
- Take the Gauldur Amulet
Walkthrough
There are multiple ways to begin this quest. First is by reading the book "Lost Legends" found throughout Skyrim. Please see Lost Legends locations for more information on their locations. a copy can be found on a Dead adventurers body in Reachwater Rock where part of this quest takes place. The quest can also be activated by reading a Writ of Sealing in any of the burial locations.
Folgunthur

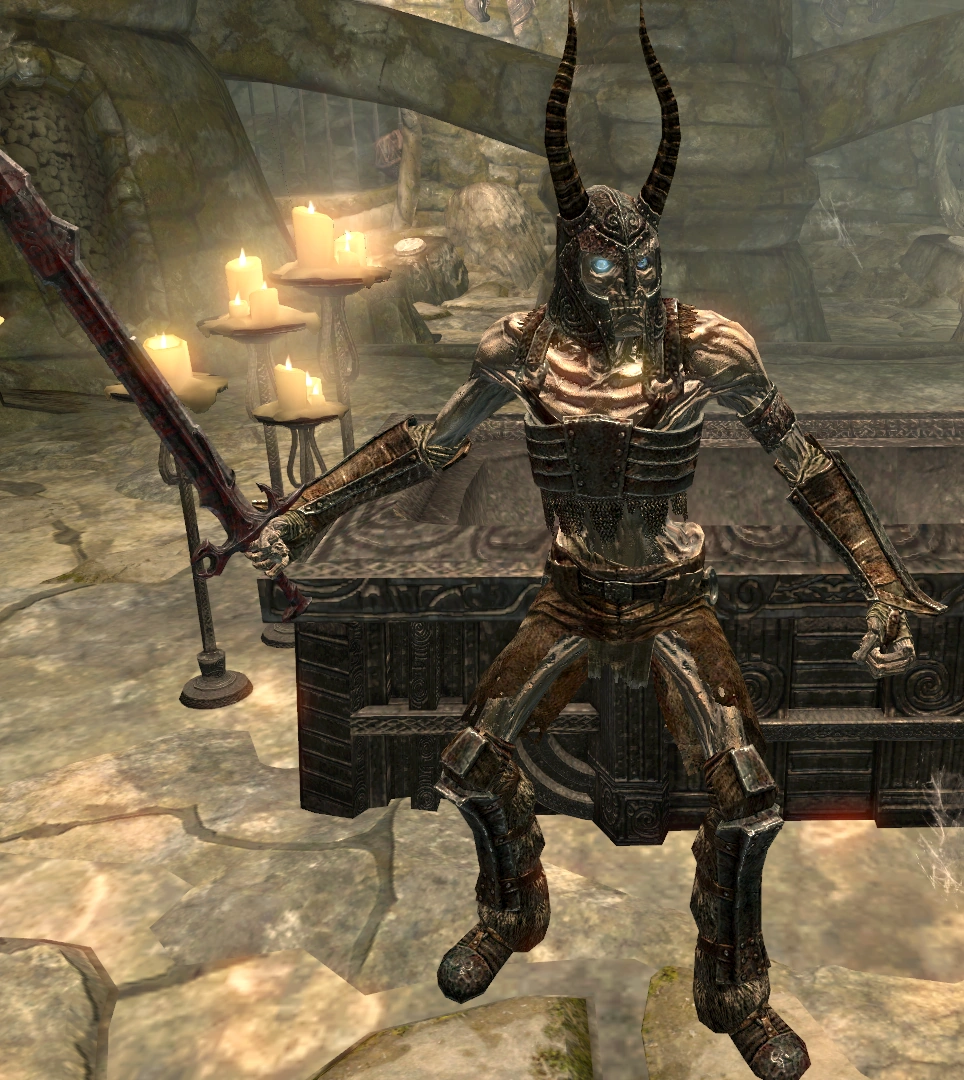
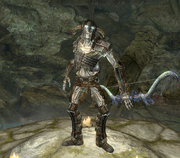
Mikrul Gauldurson
Travel to Folgunthur and read the journal of Daynas Valen in the camp outside the cave. The journal tells the Dragonborn about his travels with the Ivory Dragon Claw. He traveled to Folgunthur looking for the Amulet. Follow him inside, past the corpse of his compatriots. He will be lying on a Claw button next to a bridge. Take the Claw and his notes, read them, and activate the button to cross the bridge. Once across and having avoided the traps and Draugr, the Dragonborn will come to a gate with four levers. In sequence, pull the two on the right starting at the one nearest the gate, and after those two pull the lever on the left furthest from the gate then pull the one on the right closest to the gate and the gates will all be up. Follow the path to the room with two thrones, facing a chain lever to open the grille in the floor covering a staircase. The lever to the left of the leftmost throne opens the door to the room with pillars to unlock the grille (eagle-whale-snake). The chain pull in the previous room finishes the job. Descend and deal with two Frostbite Spiders in the room below. ahead will be a rotating-ring hole, similar to Bleak Falls Barrow. Dispatch several Draugr, and enter the combination to the puzzle (Eagle-Eagle-Dragon). Once inside, fight Mikrul Gauldurson, one of the easier Gauldur brothers as he has no special skills that seperate him from a regular leveled draugr, he does however have a small contingent of leveled draugr thralls who will attack the player upon Mikrul's awakening. Take his Gauldur Amulet Fragment and enchanted sword, Gauldur Blackblade. After beating him, use the claw to gain access to the two rooms on the back wall. One has a shout, that can complete the miscellaneous quest Find the Word of Power given by the Greybeards. Proceed to leave by using the door to the right of the word wall.
Saarthal Excavation
Jyrik Gauldurson
In order to gain access to the excavation site, the Dragonborn must first begin the quest Under Saarthal. This quest is attained by joining The College of Winterhold. If the Dragonborn is not skilled with magic it may be suggested to not join until prompted by the quest Elder Knowledge as this will only require the dragonborn to demonstrate their Thu'um to join the college (after asking her if an exception may be made for being dragonborn). After completing the very short quest First Lesson, Tolfdir will give the quest Under Saarthal. Upon this journey Tolfdir will be by your side for most of the dungeon, making the hardest part a short stretch where he leaves you after defeating a room full of draugr, and coming back right before Dragonborn discovers the antechamber with Jyrik and The Eye of Magnus inside. Defeat Jyrik in Saarthal, by the orb, and take his Writ of Sealing and his Gauldur Amulet Fragment. To defeat him as a mage watch the elemental cloud around him as it changes randomly between storm, frost, and fire, and do not use the element that is cloaking him as he will resist the attack. Warriors may treat him like a Draugr Scourge Lord, or another Draugr mage. Read the writ to start the next quest point. Then, go to the Arcaneum and (if dragonborn hasn't already) read the book Lost Legends (on a small table on the right hand side of the room, behind the pillars not in the middle, as you enter) to get the next clue about the origin of the Gauldur Amulet Fragment.
Geirmund's Hall
Sigdis Gauldurson
Geirmund's Hall is a dungeon close to Ivarstead, grave of the hero Geirmund. Travel there and upon entering the cave, there is a large hole in the ground, drop through it. There is an underwater alcove, with a chest and a Potion of Waterbreathing. Climb up the steps and enter a room with a puzzle, the order of the stones starting from the first one is Eagle, dolphin, Snake, dolphin. Activate the lever by the door. The next room, after fighting a few Draugrs along the way the dragonborn should come to a large room and after climbing the steps, immediately to your right is an altar with the body of Geirmund holding a key. Take the door opposite Geirmunds resting place, and follow the path to the left, where the dragonborn will encounter a strong leveled Draugr. once he is killed you reach a dead end and a lever on the ground; don't pull that lever as it's a trap but if you look the opposite direction from it, you will find another lever (a few feet on the wall behind it); pull that one instead and the drawbridge will drop.

Sigdis and his clones
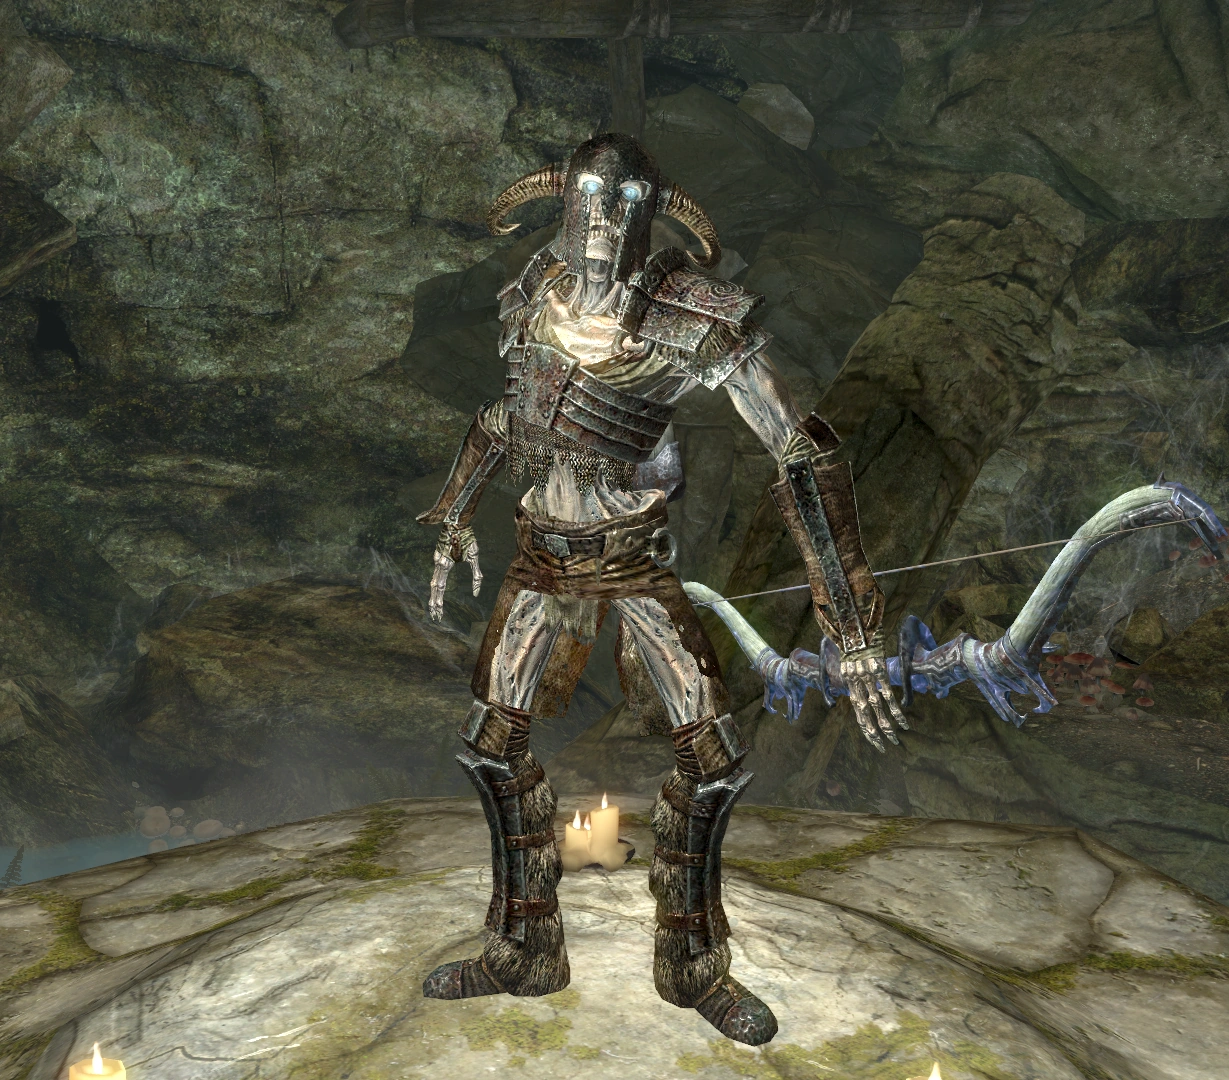
Then face Sigdis Gauldurson, arguably the hardest of the three sons if the player went at the boss without using stealth while taking potshots at it with range attacks. There are four sigils on the ground in the cave where you fight him. He will teleport to whichever three you are farthest away from and make two copies of himself. All three will attack you, including using Shouts like Unrelenting Force (which will knock you over whether the Dragonborn has any bonuses for the Unrelenting Force shout or not) and, at higher levels, Disarm. If you attack one of the clones, it will dissipate after one hit, and after both clones have died Sigdis will teleport away again. It is possible to tell Sigdis apart from his clones because he is the only one with the true health amount (the clones will have full health), and also by the fact that his clones, being summoned, will be surrounded by a bluish glow, in addition the "real" Sigdis can be identified by being the only one wearing an Ancient Nord Helmet, with his helm's decorative horns curling downwards; the horns on his clones' helmets will be curled upward. Sigdis also carries the Gauldur Blackbow. After you have killed him, take the Gauldur Amulet Fragment.
Notes:
- If you have a healthy supply of empty petty soul gems, a bow with soul trap, and good sneak skill, you can farm the clones to gather a good number of souls.
- Try not to fall down the hole again while exiting the dungeon.
Forging the Amulet
Door Combinations:
- Emerald Claw: Bear, Whale, Snake
- Ivory Claw: Eagle, Eagle, Dragon
After all of the fragments have been collected, go to Reachwater Rock, near Karthspire. Inside, there the Dragonborn will find a dead Adventurer near the Emerald Dragon Claw, on a pedestal along with a note warning would-be explorers away from the site. Enter the claw door using the combination inscribed on the palm of the Emerald Claw: Bear, Whale, Snake (from the top down.) Inside will be yet another Claw door, this time using the Ivory Dragon Claw's combination Eagle, Eagle, Dragon (again, from the top down.) Place the three amulet fragments on the pedestal to make the ghosts of each son to appear which the Dragonborn will have to fight in turn.
First will be Mikrul, who again can be faced as a leveled Draugr with a small horde, the draugr he commands will not stop attacking until Mikrul is defeated
Sigdis will use the same tactics as before, disappearing and reappearing to shoot arrows at you, using four out of the six possible locations, and using shouts occasionally. Take advantage of his teleports to abuse the wait function, restoring your health and providing a handy autosave. The real Sigdis has a slightly different helmet model (iron helmet) than his clones, and his clones will always have full health, and be surrounded by a slightly bluish glow.
After Sigdis, Jyrik will appear occasionally teleporting around the room.
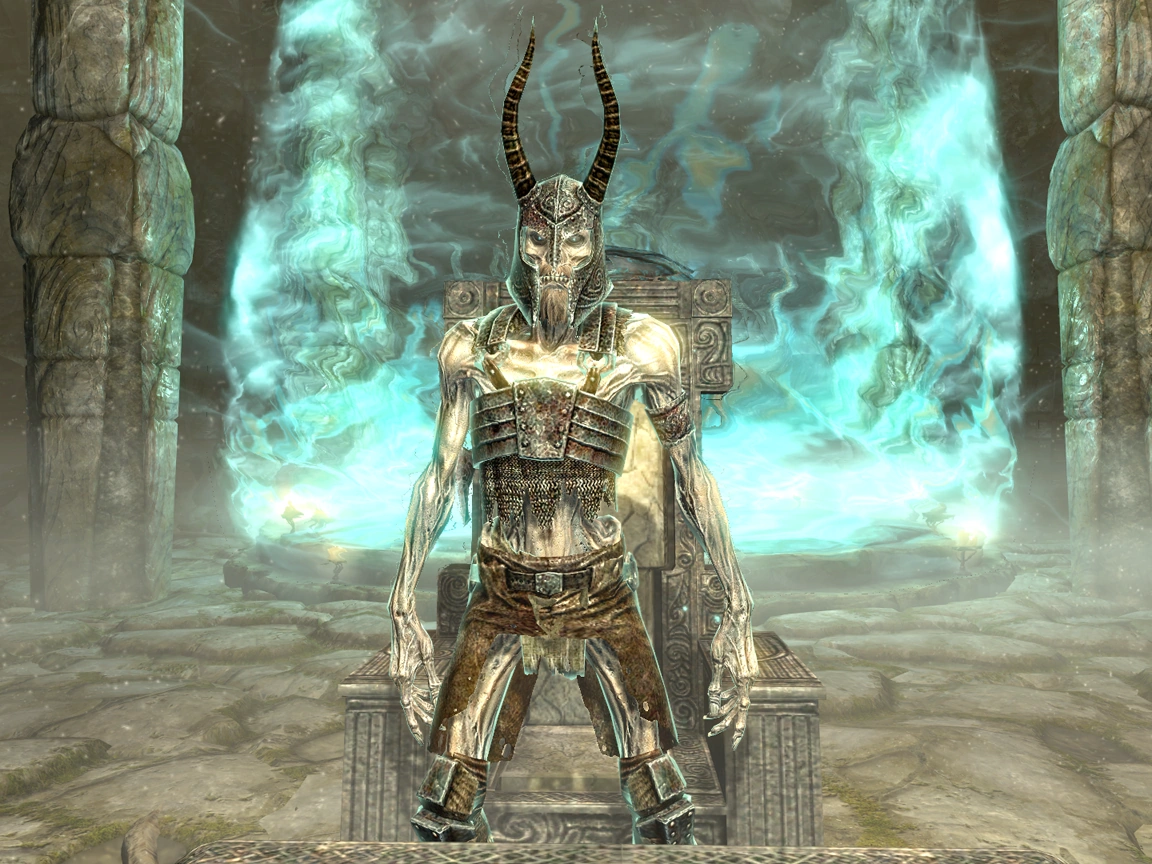
Once all three sons have been defeated, they will reappear as ghosts above the pedestal, as they look to take you on three against one their father appears and banishes them. Archmage Gauldur will then reforge the Gauldur Amulet Fragments into The Gauldur Amulet, a necklace that grants +30 to health, magicka, and stamina.
Don't forget to loot Gauldur's skeleton before you leave, as it holds a decent amount of money. Additionally, be sure to watch out for the Ghosts' use of Unrelenting Force as you may get stuck on the platform that the Ghosts you haven't fought are on, and will not be able to get back down.
- Note: There are some good chests/ loot to be found when exiting the cave that the player would have likely missed. The locations are:
- At the entrance to Gauldur's grave, the player can find a false wall which leads to some leveled loot which should automatically unveil itself upon clearing the dungeon.
- There is a chest (adept) containing leveled loot and potions in the chamber where you found the Emerald Dragon Claw that's on top of a pillar. Using the Whirlwind Thu'um may be necessary for some players in order to reach the platform.
- There is also a Giant floater in Arriva's bog and an Iron Shield in the water, just under a floating skeleton.
- There is also another chest (adept) in the water below the pillar in Reachwater Rock.
Trivia
- The battle with Sigdis and the way he fights is strikingly similar to the Wizzrobes of the Legend of Zelda series. Both enemies teleport around the room to designated spots, make clones of themselves (which can be picked out from the real one with a sharp eye) and shoot projectiles at the player.
Bugs
| Click to show |
|---|
|
Appearances
- The Elder Scrolls V: Skyrim Template:1st