AkulakhanBot (talk | contribs) m (→Fourth Era: Link fix) Tag: apiedit |
Tag: Visual edit |
||
| (28 intermediate revisions by 15 users not shown) | |||
| Line 8: | Line 8: | ||
|quests = [[The Staff of Magnus (Skyrim)|The Staff of Magnus]] |
|quests = [[The Staff of Magnus (Skyrim)|The Staff of Magnus]] |
||
|characters = |
|characters = |
||
| − | |enemies = [[Frost Troll (Skyrim)|Frost Troll]]s <small>(exterior)</small><br />[[Troll (Skyrim)|Trolls]] <small>(interior)</small><br />[[Skeleton (Skyrim)|Skeleton]]<br />[[Skeletal Dragon (Skyrim)|Skeletal Dragon]]<br />[[Draugr (Skyrim)|Draugr]]<br />[[Morokei]]<br />[[Estormo]] |
+ | |enemies = [[Frost Troll (Skyrim)|Frost Troll]]s <small>(exterior)</small><br />[[Troll (Skyrim)|Trolls]] <small>(interior)</small><br />[[Skeleton (Skyrim)|Skeleton]]<br />[[Skeletal Dragon (Skyrim)|Skeletal Dragon]]<br />[[Draugr (Skyrim)|Draugr]]<br />[[Morokei (Skyrim)|Morokei]]<br />[[Estormo]] |
| − | |type = |
+ | |type = Nordic Tomb |
|LocationID = Labyrinthian01<br />Labyrinthian03<br />LabyrinthianExterior |
|LocationID = Labyrinthian01<br />Labyrinthian03<br />LabyrinthianExterior |
||
| + | }} |
||
| − | + | {{For|2=Labyrinthian}} |
|
| − | '''Labyrinthian''' is an ancient [[Nord (Skyrim)|Nordic]] ruin in {{Skyrim}}. It can be accessed during the quest "[[The Staff of Magnus (Skyrim)|The Staff of Magnus]]" during the [[College of Winterhold]] questline. Labyrinthian is located northeast of [[Drelas' Cottage]] and southeast of [[Morthal (Skyrim)|Morthal]]. It is in the [[Hjaalmarch]] hold and is the location of two different [[word wall]]s; [[Dismay]] and [[Slow Time]]. [[Frost Troll (Skyrim)|Frost trolls]] inhabit the outside area. |
+ | '''Labyrinthian''' is an ancient [[Nord (Skyrim)|Nordic]] ruin in {{Skyrim}}. It can be accessed during the quest "[[The Staff of Magnus (Skyrim)|The Staff of Magnus]]" during the [[College of Winterhold (Skyrim)|College of Winterhold]] questline. Labyrinthian is located northeast of [[Drelas' Cottage]] and southeast of [[Morthal (Skyrim)|Morthal]]. It is in the [[Hjaalmarch]] hold and is the location of two different [[word wall]]s; [[Dismay]] and [[Slow Time]]. [[Frost Troll (Skyrim)|Frost trolls]] inhabit the outside area. |
==History== |
==History== |
||
| Line 30: | Line 31: | ||
In the [[Fourth Era]], the city of Labyrinthian was but a memory. Like most ancient Atmoran cities in [[Skyrim]], it had been abandoned and fell into ruin as people migrated and spread across the country.<ref>Observations of Ancient Nordic Cities</ref> Occasionally, trading caravans will pass through Labyrinthian, but will usually take safer, longer routes due to the freezing cold, snow, wind, and frost trolls in Labyrinthian and across the mountains.<ref>[[Loading Screens (Skyrim)]]</ref> |
In the [[Fourth Era]], the city of Labyrinthian was but a memory. Like most ancient Atmoran cities in [[Skyrim]], it had been abandoned and fell into ruin as people migrated and spread across the country.<ref>Observations of Ancient Nordic Cities</ref> Occasionally, trading caravans will pass through Labyrinthian, but will usually take safer, longer routes due to the freezing cold, snow, wind, and frost trolls in Labyrinthian and across the mountains.<ref>[[Loading Screens (Skyrim)]]</ref> |
||
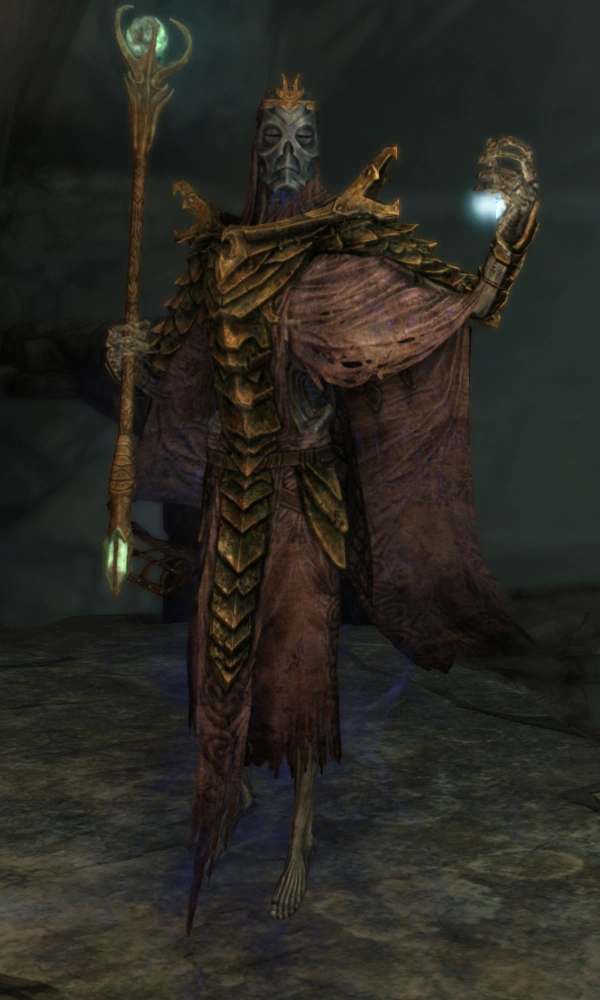
[[File:Morokei.png|thumb|236x236px|Morokei holding the Staff of Magnus]] |
[[File:Morokei.png|thumb|236x236px|Morokei holding the Staff of Magnus]] |
||
| − | Before becoming [[Arch-Mage]], [[Savos Aren]] joined an expedition to Labyrinthian. Led by the Arch-Mage's favorite student, [[Atmah]], a group of mages ventured into the ruins, searching for the [[Staff of Magnus (Skyrim)|Staff of Magnus]] and various other items believed to be within. [[Shalidor's Insights (Book)|Shalidor's writings]] are specifically mentioned as a hoped-for find by Savos, although they are not found in the passages. Accompanying Savos and Atmah were their fellow mages [[Takes-In-Light]], [[Hafnar Ice-Fist]], [[Girduin]], and [[Elvali Veren]]. Half of the group perished in the ruins. The other three reached the final chamber, where they encountered the ancient Dragon Priest [[Morokei]]. Desperate to contain the evil power of the Dragon Priest, Savos killed his two remaining companions and raised them as ghostly thralls, who remained in the chamber to maintain a magical containment ward to prevent Morokei from ever escaping. |
+ | Before becoming [[Arch-Mage]], [[Savos Aren]] joined an expedition to Labyrinthian. Led by the Arch-Mage's favorite student, [[Atmah]], a group of mages ventured into the ruins, searching for the [[Staff of Magnus (Skyrim)|Staff of Magnus]] and various other items believed to be within. [[Shalidor's Insights (Book)|Shalidor's writings]] are specifically mentioned as a hoped-for find by Savos, although they are not found in the passages. Accompanying Savos and Atmah were their fellow mages [[Takes-In-Light]], [[Hafnar Ice-Fist]], [[Girduin]], and [[Elvali Veren]]. Half of the group perished in the ruins. The other three reached the final chamber, where they encountered the ancient Dragon Priest [[Morokei (Skyrim)|Morokei]]. Desperate to contain the evil power of the Dragon Priest, Savos killed his two remaining companions and raised them as ghostly thralls, who remained in the chamber to maintain a magical containment ward to prevent Morokei from ever escaping. |
Many years later, the [[Last Dragonborn|Dragonborn]] visits Labyrinthian and follows in this group's footsteps in order to obtain the Staff of Magnus, needed to stop the machinations of [[Ancano (Skyrim)|Ancano]] back at the College of Winterhold. The Dragonborn kills the two ghostly thralls in order to destroy Morokei and obtain the staff.<ref>Dialogue with [[Savos Aren]]</ref><ref>Events of {{Skyrim}}</ref> |
Many years later, the [[Last Dragonborn|Dragonborn]] visits Labyrinthian and follows in this group's footsteps in order to obtain the Staff of Magnus, needed to stop the machinations of [[Ancano (Skyrim)|Ancano]] back at the College of Winterhold. The Dragonborn kills the two ghostly thralls in order to destroy Morokei and obtain the staff.<ref>Dialogue with [[Savos Aren]]</ref><ref>Events of {{Skyrim}}</ref> |
||
| Line 36: | Line 37: | ||
==Design and features== |
==Design and features== |
||
This is a very large area composed of many sub-levels, all of which are worth exploring. Upon entering this area, the Dragonborn is greeted by several frost trolls. |
This is a very large area composed of many sub-levels, all of which are worth exploring. Upon entering this area, the Dragonborn is greeted by several frost trolls. |
||
| + | |||
| ⚫ | |||
| + | While going through the Labyrinthian Chasm, several elemental doors are found; ice and fire. While going through this part of the ruin, a voice speaks to the Dragonborn. |
||
| + | |||
| + | ====Ice door==== |
||
| + | The first elemental door is the ice door, which is guarded by a Frost Spirit. Upon defeating the spirit, a spell involving fire is required to continue. |
||
| + | |||
| + | ====Fire door==== |
||
| + | The second elemental door is the fire door, which is guarded by a Fire Spirit. A frost spell is required to open the door. |
||
===Bromjunaar Sanctuary=== |
===Bromjunaar Sanctuary=== |
||
| − | In the center, there is a large, raised circular area, similar in appearance to the many [[Dragon Burial Mounds]] found throughout Skyrim. Beneath this is a strange ruined altar, where can be found a skeleton, the [[Wooden Mask]], and a [[Hired Thug's Missive|thug's missive]]. Equipping the Wooden Mask will transport the Dragonborn back to a time when they will find a series of busts in the place of the strange altar. In this time and place, the Dragonborn can place each of the [[Dragon Priest Mask|Dragon Priests' masks]] found throughout Skyrim on the altar. When all eight masks are in place, the dragon's mouth opens, and a ninth mask is revealed: [[Konahrik]]. |
+ | In the center, there is a large, raised circular area, similar in appearance to the many [[Dragon Burial Mounds]] found throughout Skyrim. Beneath this is a strange ruined altar, where can be found a skeleton, the [[Wooden Mask]], and a [[Hired Thug's Missive|thug's missive]]. Equipping the Wooden Mask will transport the Dragonborn back to a time when they will find a series of busts in the place of the strange altar. In this time and place, the Dragonborn can place each of the [[Dragon Priest Mask (Skyrim)|Dragon Priests' masks]] found throughout Skyrim on the altar. When all eight masks are in place, the dragon's mouth opens, and a ninth mask is revealed: [[Konahrik]]. |
===Shalidor's Maze=== |
===Shalidor's Maze=== |
||
| Line 46: | Line 56: | ||
[[File:The LabyrinthLabyrinthian.png|thumb|200px|The Labyrinth]] |
[[File:The LabyrinthLabyrinthian.png|thumb|200px|The Labyrinth]] |
||
| − | Continuing straight, a Sigil of Alteration is on the wall at the very entrance. Using the [[Staff of Magelight]] on the sigil will cause the gate to the right to open. Continuing through the maze, there are [[Skeever (Skyrim)|skeevers]] along the way. Many corners of the maze feature "shutters" which contain random loot, one containing a [[Spell Tome (Skyrim)|spell tome]] for [[Heal Other]]. Next will be a similar Sigil of Destruction. Using the [[Staff of Fireballs]] will open the trapdoor below. Right and up a staircase, to the left side of the maze, then north, (right, if at the top of the staircase), is a word wall for the dragon shout [[Dismay]]. |
+ | Continuing straight, a Sigil of Alteration is on the wall at the very entrance. Using the [[Staff of Magelight]] on the sigil will cause the gate to the right to open. Continuing through the maze, there are [[Skeever (Skyrim)|skeevers]] along the way. Many corners of the maze feature "shutters" which contain random loot, one containing a [[Spell Tome (Skyrim)|spell tome]] for [[Heal Other]]. Next will be a similar Sigil of Destruction. Using the [[Staff of Fireballs]] will open the trapdoor below. Right and up a staircase, to the left side of the maze, then north, (right, if at the top of the staircase), is a word wall for the dragon shout [[Dismay]]. |
From here, turning around and looking south reveals another side of the maze, which is sealed with a Sigil of Illusion. The [[Staff of Fear]] will open it. Continuing on as last time, this time killing off an [[Ice Wraith (Skyrim)|ice wraith]], at the end, the Sigil of Restoration is displayed. The [[Staff of Repulsion]] will open another trap door. |
From here, turning around and looking south reveals another side of the maze, which is sealed with a Sigil of Illusion. The [[Staff of Fear]] will open it. Continuing on as last time, this time killing off an [[Ice Wraith (Skyrim)|ice wraith]], at the end, the Sigil of Restoration is displayed. The [[Staff of Repulsion]] will open another trap door. |
||
| Line 57: | Line 67: | ||
Enter through the door which is at the base of the in-ground stairs, as opposed to the door set into the wall face; that is the exit. The area just beyond the entrance door is not overly dangerous, although several draugr may be encountered. Two draugr are lying on a stone slab, which can be killed before they have a chance to rise and attack. Go through the door activated by pressure pads and follow the hallway to a larger room. Fight the four draugr here, then pass through a wooden door. To the left is an apprentice-level locked door to [[Lockpick (Skyrim)|pick]]; avoid the pressure pad just before the door, as it activates a poison dart trap. Beyond the locked door is a [[steel horned helmet]] and two [[Containers (Skyrim)|burial urns]] to loot. Exit this small room and proceed in the opposite direction. |
Enter through the door which is at the base of the in-ground stairs, as opposed to the door set into the wall face; that is the exit. The area just beyond the entrance door is not overly dangerous, although several draugr may be encountered. Two draugr are lying on a stone slab, which can be killed before they have a chance to rise and attack. Go through the door activated by pressure pads and follow the hallway to a larger room. Fight the four draugr here, then pass through a wooden door. To the left is an apprentice-level locked door to [[Lockpick (Skyrim)|pick]]; avoid the pressure pad just before the door, as it activates a poison dart trap. Beyond the locked door is a [[steel horned helmet]] and two [[Containers (Skyrim)|burial urns]] to loot. Exit this small room and proceed in the opposite direction. |
||
| − | A [[Draugr Deathlord (Skyrim)|Draugr Deathlord]] guards a chest in the next room, near a fairly deep hole. It may use [[Unrelenting Force (Skyrim)|Unrelenting Force]] to knock the Dragonborn into this hole. Once the Deathlord is defeated, enter the room behind it to find a chest. Drop down the hole, landing on the beams partway down to avoid injury, and at the bottom do battle with another Draugr Deathlord. These two Deathlords carry randomized [[Ebony Weapons (Skyrim)|ebony weapons]], making it possible to obtain powerful weapons at relatively low levels. |
+ | A [[Draugr Deathlord (Skyrim)|Draugr Deathlord]] guards a chest in the next room, near a fairly deep hole. It may use [[Unrelenting Force (Skyrim)|Unrelenting Force]] to knock the Dragonborn into this hole. Once the Deathlord is defeated, enter the room behind it to find a chest. Drop down the hole, landing on the beams partway down to avoid injury, and at the bottom do battle with another Draugr Deathlord. These two Deathlords carry randomized [[Ebony Weapons (Skyrim)|ebony weapons]], making it possible to obtain powerful weapons, including the [[Ebony Bow (Skyrim)|ebony bow]] at relatively low levels. |
===Ceremonial Door=== |
===Ceremonial Door=== |
||
| Line 66: | Line 76: | ||
==Loot== |
==Loot== |
||
===Outside Labyrinthian=== |
===Outside Labyrinthian=== |
||
| − | *Dragon Priest Mask: [[Wooden Mask]] underneath a large, raised circular area. Next to the skeleton. |
+ | *Dragon Priest Mask: [[Wooden Mask]] underneath a large, raised circular area. Next to the skeleton. Located in the central barrow barrow of Labyrinthian, also known as Bromjunaar Sanctuary. Also at East Entrance of Labyrinthian. |
*''[[Hired Thug's Missive]]'' note. |
*''[[Hired Thug's Missive]]'' note. |
||
*[[Containers (Skyrim)#Urn|Urns]] containing random loot |
*[[Containers (Skyrim)#Urn|Urns]] containing random loot |
||
| Line 74: | Line 84: | ||
*[[Spell Tome (Skyrim)|Spell tome]] for [[Detect Life (Skyrim)|Detect Life]], [[Ironflesh]], [[Waterbreathing (Skyrim)|Waterbreathing]], or [[Telekinesis (Skyrim)|Telekinesis]] on the right table when entering the first chamber of the Labyrinthian. |
*[[Spell Tome (Skyrim)|Spell tome]] for [[Detect Life (Skyrim)|Detect Life]], [[Ironflesh]], [[Waterbreathing (Skyrim)|Waterbreathing]], or [[Telekinesis (Skyrim)|Telekinesis]] on the right table when entering the first chamber of the Labyrinthian. |
||
*Spell tome: [[Equilibrium (Skyrim)|Equilibrium]], in the room with the [[arcane enchanter]] |
*Spell tome: [[Equilibrium (Skyrim)|Equilibrium]], in the room with the [[arcane enchanter]] |
||
| + | *''[[Immortal Blood]]'', on a table next to an [[Arcane Enchanter (Skyrim)|arcane enchanter]] |
||
*There is a skeletal dragon that drops five [[dragon bone]]s |
*There is a skeletal dragon that drops five [[dragon bone]]s |
||
*Special weapons: |
*Special weapons: |
||
| Line 91: | Line 102: | ||
====Labyrinthian, Tribune==== |
====Labyrinthian, Tribune==== |
||
*[[Word Wall]]: [[Slow Time]] |
*[[Word Wall]]: [[Slow Time]] |
||
| − | *Unique Weapon: [[Staff of Magnus (Skyrim)|Staff of Magnus]] |
+ | *Unique Weapon: [[Staff of Magnus (Skyrim)|Staff of Magnus]] ( kill Morokei to obtain staff ) |
*Dragon Priest Mask: [[Morokei (Mask)|Morokei]] |
*Dragon Priest Mask: [[Morokei (Mask)|Morokei]] |
||
*Unique Item: [[Ancient Helmet of the Unburned]], as well as a [[Honed Ancient Nord Greatsword]] of Scorching and an [[Ebony Shield (Skyrim)|ebony shield]] in a room behind an adept locked gate, soon after entering the Tribune. |
*Unique Item: [[Ancient Helmet of the Unburned]], as well as a [[Honed Ancient Nord Greatsword]] of Scorching and an [[Ebony Shield (Skyrim)|ebony shield]] in a room behind an adept locked gate, soon after entering the Tribune. |
||
*Two [[malachite ore]]: One at the top of the tall building that has many barrels inside of it. The other is in the water at the base of said tower. |
*Two [[malachite ore]]: One at the top of the tall building that has many barrels inside of it. The other is in the water at the base of said tower. |
||
| + | *One [[Silver Sapphire Necklace]] can be found to the right of the [[Slow Time]] [[Word Wall]] on top of an outcropping of rocks along the cave wall. The necklace is around the neck of a skeleton which, interestingly, has the skeleton of a baby inside its stomach. |
||
===[[Shalidor's Maze]]=== |
===[[Shalidor's Maze]]=== |
||
| Line 134: | Line 146: | ||
*[[Slaughterfish Egg]] |
*[[Slaughterfish Egg]] |
||
*[[Slaughterfish Scales]] |
*[[Slaughterfish Scales]] |
||
| − | *[[Spider Egg (Skyrim)|Spider Egg]] (in a barrel in the Labyrinthian Tribune, right near the end of the dungeon, just past |
+ | *[[Spider Egg (Skyrim)|Spider Egg]] (in a barrel in the Labyrinthian Tribune, right near the end of the dungeon, just past Morokei) |
*[[White Cap (Skyrim)|White Cap]] (four in a barrel in the Labyrinthian Tribune) |
*[[White Cap (Skyrim)|White Cap]] (four in a barrel in the Labyrinthian Tribune) |
||
*[[Wisp Wrappings]] |
*[[Wisp Wrappings]] |
||
| Line 143: | Line 155: | ||
==Quests== |
==Quests== |
||
| − | *[[The Staff of Magnus (Skyrim)|The Staff of Magnus]] — In the [[College of Winterhold]]'s faction questline. |
+ | *[[The Staff of Magnus (Skyrim)|The Staff of Magnus]] — In the [[College of Winterhold (Skyrim)|College of Winterhold]]'s faction questline. |
| + | *[[Shalidor's Insights (Quest)|Shalidor's Insights]] — received from Urag Go-Shub |
||
==Labyrinthian in Arena== |
==Labyrinthian in Arena== |
||
| Line 154: | Line 167: | ||
==Trivia== |
==Trivia== |
||
| − | *If level 35 or higher, an [[Ancient Dragon]] may appear here. |
+ | *If level 35 or higher, an [[Ancient Dragon (Skyrim)|Ancient Dragon]] may appear here. |
*This is the only known location in Skyrim to contain two word walls. |
*This is the only known location in Skyrim to contain two word walls. |
||
| Line 168: | Line 181: | ||
**{{PC}} Solution: change the language by downloading [https://docs.google.com/viewer?a=v&pid=explorer&chrome=true&srcid=0B8IiuGPJ5HYGM2Q1ZmRlNGEtMjVlZS00NDAwLWE4MDctMDg1M2UyOTRhYTRi&hl=en_US this archive], unzip it into ''Skyrim_Path/data'', and edit the ''Skyrim_Path/skyrim.ini'' to change '''French''' into '''English'''. After that, the Sigil of Illusion needs the [[Staff of Magelight]]. Confirmed on German version. |
**{{PC}} Solution: change the language by downloading [https://docs.google.com/viewer?a=v&pid=explorer&chrome=true&srcid=0B8IiuGPJ5HYGM2Q1ZmRlNGEtMjVlZS00NDAwLWE4MDctMDg1M2UyOTRhYTRi&hl=en_US this archive], unzip it into ''Skyrim_Path/data'', and edit the ''Skyrim_Path/skyrim.ini'' to change '''French''' into '''English'''. After that, the Sigil of Illusion needs the [[Staff of Magelight]]. Confirmed on German version. |
||
*After solving Shalidor's Maze, and having been teleported to what appears to be an oblivion plane to fight a boss type enemy, sometimes, he merely charges and then everyone is transported back to the entrance of the maze where atronachs join the boss. If the atronachs are destroyed first, he may disappear and cannot be found again. |
*After solving Shalidor's Maze, and having been teleported to what appears to be an oblivion plane to fight a boss type enemy, sometimes, he merely charges and then everyone is transported back to the entrance of the maze where atronachs join the boss. If the atronachs are destroyed first, he may disappear and cannot be found again. |
||
| − | *{{XBOX360}} Staff of Repulsion may not appear with other three staves, and using Heal Other Spell does not work on the Sigil of Restoration. |
+ | *{{XBOX360}}{{PS4}} Staff of Repulsion may not appear with other three staves, and using Heal Other Spell does not work on the Sigil of Restoration. |
*It is possible to retrieve a Staff of Magnus, leave Labyrinthian, and return later to retrieve a second Staff of Magnus from Morokei's body by not learning the shout Slow Time. |
*It is possible to retrieve a Staff of Magnus, leave Labyrinthian, and return later to retrieve a second Staff of Magnus from Morokei's body by not learning the shout Slow Time. |
||
| − | *{{ALLPLAT}} If [[Cosnach]] or [[Ghorbash the Iron Hand]] (PS3), [[Aela the Huntress (Skyrim)|Aela the Huntress]] (PC) or [[Calder]], [[Cicero]] or [[J'zargo]] (Xbox 360) are taken into Shalidor's Maze they will glitch and never exit the place. Leaving through the door and teleporting will fix the problem. |
+ | *{{ALLPLAT}} If [[Cosnach]] or [[Ghorbash the Iron Hand]] (PS3), [[Aela the Huntress (Skyrim)|Aela the Huntress]] (PC) or [[Calder]], [[Cicero]] or [[J'zargo (Skyrim)|J'zargo]] (Xbox 360) are taken into Shalidor's Maze they will glitch and never exit the place. Leaving through the door and teleporting will fix the problem. |
**{{XBOX360}} [[Vorstag]], [[Serana]], and [[Bran]] also are effected by this. |
**{{XBOX360}} [[Vorstag]], [[Serana]], and [[Bran]] also are effected by this. |
||
*{{XBOX360}} Riding a horse into the Bromjunaar Sanctuary can result in the Dragonborn falling outside of Skyrim. Reloading an old save can cause the Dragonborn to move as if on fast-forward while the rest of the world continues to go at a normal rate. |
*{{XBOX360}} Riding a horse into the Bromjunaar Sanctuary can result in the Dragonborn falling outside of Skyrim. Reloading an old save can cause the Dragonborn to move as if on fast-forward while the rest of the world continues to go at a normal rate. |
||
| − | *{{ |
+ | *{{XBOX360}}{{PS3}} Clearing Lost Valkygg can result in Labyrinthian being labeled as "Cleared." |
*If {{Dawnguard|!}} is installed, Durnehviir may spawn if the Dragonborn [[Fast Travel (Skyrim)|fast travels]] to Labyrinthian. |
*If {{Dawnguard|!}} is installed, Durnehviir may spawn if the Dragonborn [[Fast Travel (Skyrim)|fast travels]] to Labyrinthian. |
||
|} |
|} |
||
| Line 185: | Line 198: | ||
<!--Interwiki links--> |
<!--Interwiki links--> |
||
[[de:Labyrinthion]] |
[[de:Labyrinthion]] |
||
| − | [[es:Laberintia]] |
+ | [[es:Laberintia (Skyrim)]] |
| ⚫ | |||
| ⚫ | |||
| + | [[nl:Labyrinthian/Skyrim]] |
||
| + | [[pl:Labiryntian]] |
||
[[ru:Лабиринтиан (Skyrim)]] |
[[ru:Лабиринтиан (Skyrim)]] |
||
| ⚫ | |||
| ⚫ | |||
| ⚫ | |||
[[Category:Skyrim: Word Wall Locations]] |
[[Category:Skyrim: Word Wall Locations]] |
||
[[Category:Skyrim: Hjaalmarch Hold Locations]] |
[[Category:Skyrim: Hjaalmarch Hold Locations]] |
||
Revision as of 22:39, 16 September 2019
- For other uses, see Labyrinthian.
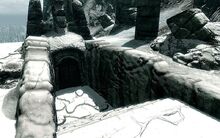
Labyrinthian is an ancient Nordic ruin in The Elder Scrolls V: Skyrim. It can be accessed during the quest "The Staff of Magnus" during the College of Winterhold questline. Labyrinthian is located northeast of Drelas' Cottage and southeast of Morthal. It is in the Hjaalmarch hold and is the location of two different word walls; Dismay and Slow Time. Frost trolls inhabit the outside area.
History
Merethic Era
- "Hail All - Brave City Bromjunaar
Forever These Walls Shall Stand
May Enemies See Her Majesty
May All Quake to Behold Her" - ―Etched Tablet in Labyrinthian[src]
The ancient Nordic ruin of Labyrinthian was first constructed by the Dragon Cult as a temple to the dragons. The temple then grew to become the city of Bromjunaar, and it is theorized that the city may have been the capital of Skyrim during the height of the Dragon Cult's power and influence, though few historical records exist to verify this. There are, however, some historical records that prove that Bromjunaar was a center for the Dragon Priests, and many of the highest ranking Dragon Priests met here to discuss important matters.[1]
During the Dragon War, the city went through drastic changes as the forces of the dragons mobilized to fight against the people of Tamriel who were rebelling against them. After the war ended, the city was abandoned and it fell into ruin.[1]
First Era
The name "Labyrinthian" comes from the labyrinth which Arch-Mage Shalidor constructed inside the ruins of Bromjunaar during the First Era to test new Archmages, as he stood at the forefront of a movement to enact higher standards among mages and to discourage magicka usage among the common castes.[1] The name Labyrinthian eventually became synonymous with Bromjunaar and, after some time, the ruins were known as such.
Third Era
At some point between 3E 389 and 3E 399, the Eternal Champion retrieved a piece of the Staff of Chaos from the Labyrinthian to defeat Imperial Battlemage Jagar Tharn.[2]
Fourth Era
In the Fourth Era, the city of Labyrinthian was but a memory. Like most ancient Atmoran cities in Skyrim, it had been abandoned and fell into ruin as people migrated and spread across the country.[3] Occasionally, trading caravans will pass through Labyrinthian, but will usually take safer, longer routes due to the freezing cold, snow, wind, and frost trolls in Labyrinthian and across the mountains.[4]
Morokei holding the Staff of Magnus
Before becoming Arch-Mage, Savos Aren joined an expedition to Labyrinthian. Led by the Arch-Mage's favorite student, Atmah, a group of mages ventured into the ruins, searching for the Staff of Magnus and various other items believed to be within. Shalidor's writings are specifically mentioned as a hoped-for find by Savos, although they are not found in the passages. Accompanying Savos and Atmah were their fellow mages Takes-In-Light, Hafnar Ice-Fist, Girduin, and Elvali Veren. Half of the group perished in the ruins. The other three reached the final chamber, where they encountered the ancient Dragon Priest Morokei. Desperate to contain the evil power of the Dragon Priest, Savos killed his two remaining companions and raised them as ghostly thralls, who remained in the chamber to maintain a magical containment ward to prevent Morokei from ever escaping.
Many years later, the Dragonborn visits Labyrinthian and follows in this group's footsteps in order to obtain the Staff of Magnus, needed to stop the machinations of Ancano back at the College of Winterhold. The Dragonborn kills the two ghostly thralls in order to destroy Morokei and obtain the staff.[5][6]
Design and features
This is a very large area composed of many sub-levels, all of which are worth exploring. Upon entering this area, the Dragonborn is greeted by several frost trolls.
Labyrinthian Chasm
While going through the Labyrinthian Chasm, several elemental doors are found; ice and fire. While going through this part of the ruin, a voice speaks to the Dragonborn.
Ice door
The first elemental door is the ice door, which is guarded by a Frost Spirit. Upon defeating the spirit, a spell involving fire is required to continue.
Fire door
The second elemental door is the fire door, which is guarded by a Fire Spirit. A frost spell is required to open the door.
Bromjunaar Sanctuary
In the center, there is a large, raised circular area, similar in appearance to the many Dragon Burial Mounds found throughout Skyrim. Beneath this is a strange ruined altar, where can be found a skeleton, the Wooden Mask, and a thug's missive. Equipping the Wooden Mask will transport the Dragonborn back to a time when they will find a series of busts in the place of the strange altar. In this time and place, the Dragonborn can place each of the Dragon Priests' masks found throughout Skyrim on the altar. When all eight masks are in place, the dragon's mouth opens, and a ninth mask is revealed: Konahrik.
Shalidor's Maze
There is also a door named Shalidor's Maze, just behind the location. This leads to the maze of the same name, which is home to one daedra.
Upon passing through the door, the next area is a courtyard with a corpse in a circle and the maze just beyond. Approach the corpse, and four staves rise from the ground; one for Destruction, one for Alteration, one for Illusion, and one for Restoration. Taking the staves is optional, because if the Dragonborn already knows the staves' corresponding spells, the maze can be completed without having to take the staves.
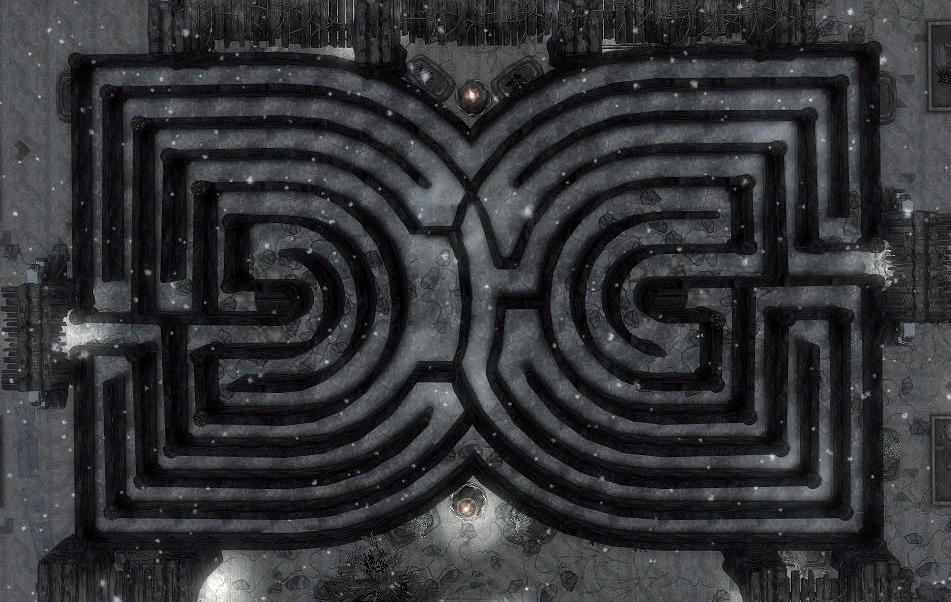
The Labyrinth
Continuing straight, a Sigil of Alteration is on the wall at the very entrance. Using the Staff of Magelight on the sigil will cause the gate to the right to open. Continuing through the maze, there are skeevers along the way. Many corners of the maze feature "shutters" which contain random loot, one containing a spell tome for Heal Other. Next will be a similar Sigil of Destruction. Using the Staff of Fireballs will open the trapdoor below. Right and up a staircase, to the left side of the maze, then north, (right, if at the top of the staircase), is a word wall for the dragon shout Dismay.
From here, turning around and looking south reveals another side of the maze, which is sealed with a Sigil of Illusion. The Staff of Fear will open it. Continuing on as last time, this time killing off an ice wraith, at the end, the Sigil of Restoration is displayed. The Staff of Repulsion will open another trap door.
After falling, there will be a large blue globe shimmering in the passageway. This is the portal to fight a dremora of leveled rank and name. He will conjure two atronachs. If he is killed before everyone teleports back to Labyrinthian, the Dragonborn and the atronachs will be teleported out, but not the body of the dremora. The dremora carries the Diadem of the Savant, a circlet which reduces magicka cost for all classes of spells.
Lost Valkygg
The Lost Valkygg is a tunnel based dungeon. It is heavily guarded by draugr. They pop out of coffins in most places, but some roam freely. This area has many gemstones, but other than that, there is little loot except what the draugr have on them.
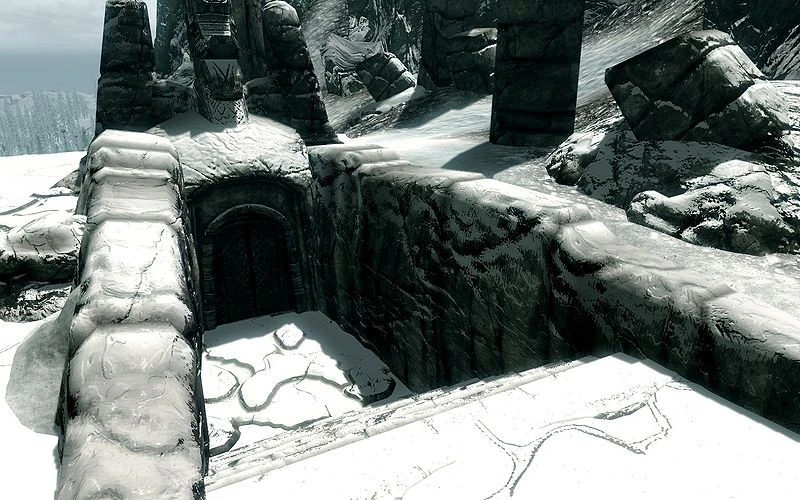
Lost Valkygg entrance
Enter through the door which is at the base of the in-ground stairs, as opposed to the door set into the wall face; that is the exit. The area just beyond the entrance door is not overly dangerous, although several draugr may be encountered. Two draugr are lying on a stone slab, which can be killed before they have a chance to rise and attack. Go through the door activated by pressure pads and follow the hallway to a larger room. Fight the four draugr here, then pass through a wooden door. To the left is an apprentice-level locked door to pick; avoid the pressure pad just before the door, as it activates a poison dart trap. Beyond the locked door is a steel horned helmet and two burial urns to loot. Exit this small room and proceed in the opposite direction.
A Draugr Deathlord guards a chest in the next room, near a fairly deep hole. It may use Unrelenting Force to knock the Dragonborn into this hole. Once the Deathlord is defeated, enter the room behind it to find a chest. Drop down the hole, landing on the beams partway down to avoid injury, and at the bottom do battle with another Draugr Deathlord. These two Deathlords carry randomized ebony weapons, making it possible to obtain powerful weapons, including the ebony bow at relatively low levels.
Ceremonial Door
This door is only opened during the College of Winterhold's quest to find the Staff of Magnus. The Torc of Labyrinthian must first be received from Mirabelle Ervine. Upon arrival, activate the Ceremonial Door and the Torc will be applied, opening the lock and allowing entry.
A Skeletal Dragon rests just inside here, along with many skeletons. These may be fought, or the Dragonborn may sneak or sprint past them to get to the next room. The skeletal dragon is only a reanimated skeleton, so the Dragonborn is unable to absorb its soul; however, once it has been defeated, it may be looted for five dragon bones. The Dragonborn must continue to make their way through the lost city from here, occasionally seeing the ghosts of Savos Aren and his companions, as they work to complete the quest "The Staff of Magnus."
Loot
Outside Labyrinthian
- Dragon Priest Mask: Wooden Mask underneath a large, raised circular area. Next to the skeleton. Located in the central barrow barrow of Labyrinthian, also known as Bromjunaar Sanctuary. Also at East Entrance of Labyrinthian.
- Hired Thug's Missive note.
- Urns containing random loot
- Chests
Inside Labyrinthian
- Spell tome for Detect Life, Ironflesh, Waterbreathing, or Telekinesis on the right table when entering the first chamber of the Labyrinthian.
- Spell tome: Equilibrium, in the room with the arcane enchanter
- Immortal Blood, on a table next to an arcane enchanter
- There is a skeletal dragon that drops five dragon bones
- Special weapons:
- Ore Deposit: gold, in the Labyrinthian Thoroughfare, on the floor in an open chamber with four skeletons just after the passageway turns right. There is a troll to kill in the immediately preceding chamber. There is a second deposit right near this one, but it cannot be interacted with.
- Five gold ore:
- In Labyrinthian Chasm, one under a Deer Hide inside of a pot, another just northwest of the previous one, amongst the urns and other debris that has accumulated near the stairs down.
- In Labyrinthian Thoroughfare, in the flowing water through a novice locked gate where one first encountered enemies in this area.
- After taking the gold ingot (see below), look west from atop of the stairs and use Whirlwind Jump to reach small ledge, where one can find two in a pot beneath linen wraps.
- Six malachite ore: Turn right at the point where the second set of enemies was encountered, there is a pathway with water running through it. There are four ore pieces scattered in that short pathway. Two more can be found in a small pool.
- One gold ingot: In the back of the Labyrinthian Thoroughfare area, where there is the option of dropping through the trap floor or going through the doorway to the right, take the doorway. At the end of the hall it is on a bookshelf.
- Three ebony ingots: Just past the Slow Time word wall, there is a pathway that has an alcove on each side. These three ingots are spread amongst the two alcoves on both sides.
- All levels of Labyrinthian are good sources of nightshade. This is especially helpful if the Dragonborn has Ingun's Task as a quest objective.
Labyrinthian, Tribune
- Word Wall: Slow Time
- Unique Weapon: Staff of Magnus ( kill Morokei to obtain staff )
- Dragon Priest Mask: Morokei
- Unique Item: Ancient Helmet of the Unburned, as well as a Honed Ancient Nord Greatsword of Scorching and an ebony shield in a room behind an adept locked gate, soon after entering the Tribune.
- Two malachite ore: One at the top of the tall building that has many barrels inside of it. The other is in the water at the base of said tower.
- One Silver Sapphire Necklace can be found to the right of the Slow Time Word Wall on top of an outcropping of rocks along the cave wall. The necklace is around the neck of a skeleton which, interestingly, has the skeleton of a baby inside its stomach.
Shalidor's Maze
- Word Wall: Dismay
- Conjuration Skill Book: Liminal Bridges, lying on the ground next to a skeleton in an enlarged corner in the maze.
- Diadem of the Savant: unique enchanted circlet.
- Alchemy ingredients:
While fighting the Dremora, the combatants will be transported back to the entrance of the area, where two atronachs spawn. Each one drops its respective salt (Frost Salts, Void Salts or Fire Salts).
Bromjunaar Sanctuary
- Dragon Priest Mask: Konahrik
- Pickpocket Skill Book: Aevar Stone-Singer
Alchemy ingredients
- Bleeding Crown (four in a barrel in the Labyrinthian Tribune)
- Blisterwort
- Bone Meal
- Canis Root
- Deathbell
- Ectoplasm
- Fire Salts
- Fly Amanita
- Giant Lichen
- Hanging Moss
- Lavender (in a barrel in the Labyrinthian Tribune)
- Nightshade
- Salt Pile
- Scaly Pholiota
- Skeever Tail
- Slaughterfish Egg
- Slaughterfish Scales
- Spider Egg (in a barrel in the Labyrinthian Tribune, right near the end of the dungeon, just past Morokei)
- White Cap (four in a barrel in the Labyrinthian Tribune)
- Wisp Wrappings
Facilities
- Alchemy lab – Inside of Labyrinthian, behind a locked door where the spell tome Equilibrium is.
- Arcane enchanter – Inside of Labyrinthian, behind a locked door where the spell tome Equilibrium is.
Quests
- The Staff of Magnus — In the College of Winterhold's faction questline.
- Shalidor's Insights — received from Urag Go-Shub
Labyrinthian in Arena
- Labyrinthian, built by Arch-Mage Shalidor, was one of the locations that appeared in Arena. It is one of the locations where a part of the Staff of Chaos is located, and the Eternal Champion is tasked with obtaining this after the "Fang Lair" quest.
Gallery
")
Trivia
- If level 35 or higher, an Ancient Dragon may appear here.
- This is the only known location in Skyrim to contain two word walls.
Bugs
|
This section contains bugs related to Labyrinthian (Skyrim). Before adding a bug to this list, consider the following:
|
| Click to see the list of bugs encountered |
|---|
|
Appearances
References
- ↑ 1.0 1.1 1.2 A Minor Maze
- ↑ Events of The Elder Scrolls: Arena
- ↑ Observations of Ancient Nordic Cities
- ↑ Loading Screens (Skyrim)
- ↑ Dialogue with Savos Aren
- ↑ Events of The Elder Scrolls V: Skyrim