- For other uses, see Revealing the Unseen.
- "[The Staff was] made and used by Magnus himself, if you believe those sorts of things. I believe I've heard it said that it's the only thing that coud adequately contain his power."
- ―Mirabelle Ervine[src]
Revealing the Unseen is a quest available in The Elder Scrolls V: Skyrim in which the Dragonborn must locate and recover the Staff of Magnus, the counterpart to the Eye of Magnus inside the College of Winterhold.
Background[]
Mirabelle has told me that members of the Synod recently visited the College, mentioning the Staff of Magnus. They were last known to be heading towards Mzulft; they may know more about where to find the staff.
Objectives[]
- Speak with Mirabelle Ervine
- Find the ruins of Mzulft
- Search for Synod researchers
- Reach the Oculory
- Find the Focusing Crystal
- Return the Crystal to Paratus
- Follow Paratus
- Place the Crystal into the Oculory
- Focus the Oculory
- Talk to Paratus
- Report to Savos Aren
- Reach Ancano
Walkthrough[]
Mirabelle may be found wandering the Hall of the Elements, in the exterior courtyard within the College, or occasionally sitting in the Hall of Countenance or Hall of Attainment. Ask her about the staff, and after a few roundabout conversations, Mirabelle recalls that some Imperials from the Synod were interested in it and came to the College to question them. Leaving empty-handed, it appears they had a secondary plan: to head toward the sprawling Dwemer ruins of Mzulft, which apparently has a derelict observatory that would somehow help locate the staff.
In the foothills by the edge of the mountains that curve through Eastmarch Hold, south and a little east of Windhelm, Mzulft still stands. There are ancient carved stone columns, archway entrances, and a spectacular stone-and-pipework facade with steam still hissing from the hillside. It is possible to open the huge golden door and step inside.
Mzulft[]
Slumped to the right of the first interior door is an Imperial named Gavros Plinius. He was ambushed while attempting to reach the Oculory, where another member of the Synod, Paratus, is holed up.
Before dying, he murmurs something about a crystal being stolen. His corpse can be looted for a couple of important items: a key that will aid in the entrance to Mzulft and a research log. Reading the log reveals who exactly was here (an attendant on behalf of the First Adjunct Oronrel) and what he was doing (delivering a new Focusing Crystal to the Oculory). Now the key may be used to open the second door.
Continuing east, the path turns left (north), where a trap trigger drops spikes from the ceiling. A dead Synod Researcher has some random loot. The path turns right (east), then left (north) again, where two Dwarven spiders are found. The path continues winding east and north with more spiders, until two huge gold doors are encountered. The doors on the left are visibly booby trapped, so it is best to stand to the right of them when opening them, or else to undo the trap trigger on the bottom right of the door. The room is a dead end, but inside it is another spider, then a vein of moonstone ore and a chest.
The other doors can be entered and a ramp climbed to the east. Another door to the left (north) leads to a more natural cavern with elements of Dwemer architecture still visible. Inside there is more moonstone ore that can be mined, up a wooden ramp to the right (east) before having to engage with the first Chaurus. Two more dead Synod researchers are found here, at the foot and the top of the ramped scaffold. There is also more ore that can be mined, plus a knapsack near the ore vein and an apothecary's satchel.
Up a sloping passage to the north is a trip wire that releases a pile of rocks. Beyond that is a second, much taller cavern that contains a mammoth skeleton, more chaurus, and an arched entrance to another finished portion of the cavern. A doorway leads north, then turns right (east) up another ramped corridor, where Dwarven spheres will attack at the top. An adept-level gate there can be unlocked for some nice loot.
Continuing to the left (north), then up a ramp to the right (east), there is a door. Beyond it is a mechanical corridor with several more Dwarven automatons near the far end. At the end of the corridor is a T intersection. To the right is a dead end. To the left (north) is a room with another Dwarven spider. A walkway leads straight, then right (east) to another T intersection. To the right (south) is a stairway that leads down to the right (west). At the bottom of those steps is an alchemy lab. To the left (south) is an expert-level gate protecting a single chest containing meager loot.
Back at the last T intersection, to the north is another door. Beyond it is a large room with a walkway around the left (west) wall, plus a stairway against the right wall that goes down to the lower part of the room. There is nothing of interest in the lower part except for two Dwarven automatons. The upper walkway is trapped - a trigger halfway through causes the pipes to extend from the wall, knocking an unsuspecting Dragonborn to the lover level. Another Dwarven sphere is along the walkway on the other (northern) side of the room.
A passage north from the upper part of the room leads to a chest, corpses of dead Falmer, and wrecked Dwarven spiders. To the right (east), a ramp leads upward. At the top, just before the doors, to the left is a chest hidden behind some rocks containing minor loot. Going through the golden doors leads into the Mzulft Boilery.
Mzulft Boilery[]
Just beyond the doors are the remains of several more Dwarven automatons. From the doors, a ramp leads up to the east. Just to the left (north) from the top of the ramp is a large area that allows proceeding right then left, or straight then right. There is a Falmer patrolling the northern side of the room. From the northeastern corner, a ramp leads further up to the east, where another Falmer lurks at the top.
The path turns left (north) and leads to a hub room with cage doors and two more Falmer. Against the left (west) wall is an expert leveled locked gate with the corpses of several Dwemer automatons. In the northern wall is an unlocked gate with nothing behind it.
Through the open doors to the east is a gap in the wall that appears to be caused by Falmer tunneling. This path continues to the left (north) with more chaurus and Falmer encounters. A small room on the right contains a Falmer chest, several sacs of chaurus eggs, and a moonstone ore vein.
The path continues generally northward past a small Falmer camp that also has several chaurus. There is a tripwire in the passage beyond the first camp. The passage leads generally northwest, then takes a sharp turn to the right (east). At the end, it turns left (north) and opens into a large room with another Falmer camp with another dead Synod researcher. Beyond, the path leads north and up through another narrow passage to another large room with a chaurus and a Falmer chest somewhat hidden in the southwest corner.
Continuing on to the north, the path returns to Dwarven-built chambers, with another Falmer patrolling the area. Ahead is a master-locked room with a skeleton and a chest visible through the barred opening. Next to the chest is a Mzulft room key. Beside the skeleton is the Alteration skillbook, The Lunar Lorkhan.
The path turns west. On the right (north) side is an expert-locked door with a chaurus behind it. The room beyond contains an apprentice-locked chest with minor loot and many Dwemer artifacts.
Back on the main path, to the west, the ceilings are higher and the chambers more impressive as a huge gallery with a flooded sunken central area is reached. Falmer are swarming about in this location. To the right (north), on the right side is an alcove with a novice-locked chest. On the opposite (west) side, at the south end, a trapped door leads to a room with a chaurus reaper and some nice loot. Back in the main room, at the northern end of the west wall is one last corridor. The doors at this corridor's end lead to the Mzulft Aedrome.
Mzulft Aedrome[]
The path starts out heading east up a ramp. At the top are a chaurus and a Falmer. Turning left (north), the path comes to a short wall with a room behind. The room contains several more Falmer. This room is the central of three giant chambers connected by corridors of ornate pillars and snaking pipes.
The central chamber has numerous Falmer, but one is especially important: a Dwarven Centurion Master boss, or a Falmer Shadowmaster, or a Falmer Gloomlurker (this is level dependent) that carries a focusing crystal. This will be needed soon, so it is important to kill and loot every enemy in this room. If Dawnguard has been installed, this enemy might be a Falmer Warmonger.
Before proceeding west, though, note that a corridor leads down to the east to a smaller room with many Dwemer artifacts, including multiple pieces of solid Dwemer metal. There are two more doors leading further to the east into similar rooms, but the last has a Dwarven centurion, Dwarven Spider Guardian or Falmer Gloomlurker (level dependent). Behind it is a chest containing valuable loot and the Mzulft Observatory key, which is necessary to open the doors to the west. There are some nice potions, ingots, and arrows on the wall shelves as well.
Back in the central room, a master-locked door to the north dead ends with a Falmer chest and a moonstone ore vein. Just to the left of the corridor leading west (to the central chamber) is a wall chest containing minor loot. Down the corridor is a door that requires the Observatory key to unlock. Beyond that door is a ramp leading up to another locked door that requires a key. However...
Oculory[]
Paratus Decimius is behind this door, and unlocks it when he hears it being tried. He has been expecting Gavros Plinius (the Synod researcher that was found dead at the entrance) and is displeased by the arrival of someone else. Once he is informed that the crystal has been brought along, and that the Dragonborn is from the College of Winterhold, he grudgingly accepts the help. He strolls along the corridor leading to a giant Dwarven armillary sphere.
Decimius is not sure what the Dwemer called this huge focusing globe, but from the Synod's research, the machinery appears to have been made to collect starlight for an as yet unknown purpose. Decimius thought to replace one of the elements with his crystal, after months of perfecting it. Using the focusing crystal will allow the Synod's research to continue. It will be necessary to activate the giant, tumbling machinery.
After following Decimius into the armillary chamber and up the ramp surrounding the sphere (and optionally speaking to him about related matters), he requests that the Oculory be approached, with the giant series of lenses atop the armillary, and the Dwarven armillary be activated.
Upon gazing around the curved observatory chamber, a series of circular blue focusing mirrors can be noticed on the ceiling panels around the chamber. Directly above the center of the Oculory are three focusing lenses.
During the daytime, a stream of bright light bounces off them, onto the ceiling. Some of the blue focusing mirrors are lit with starlight, as is the main circular mirror in the center of the ceiling. After heading up either ramp and looking to the stone table, a number of valuable items can be found:
Items gained[]
- Antecedents of Dwemer Law
- 3 x Dwemer Cog
- Dwemer History and Culture
- Dwemer Inquiries Vol I
- Dwemer Inquiries Vol II
- Dwemer Inquiries Vol III
- Spell Tome: Flames
- Spell Tome: Frostbite
Puzzle Solution[]
If the frostbite spell is not already known, the spell tome Frostbite sitting on the desk behind the control panel up the stairs needs to be read. Move around on top of the curved upper surface of the sphere, casting Flames and Frostbite (use only these novice spells, apprentice or higher leveled spells will move the mirrors differently) at the blue circles on the center of the ceiling and also cast them at the center of the ring where the crystal is until each beam of light above is focused on a separate rotating ring around the ceiling.
Each of the Dwemer pedestals atop the ramp will rotate one of the three ceiling panels. Press the button on each pedestal until the blue mirrors each line up with their respective light beam and all beams are reflected back into the center. Once all three beams/mirrors are aligned go and speak to Decimius again.
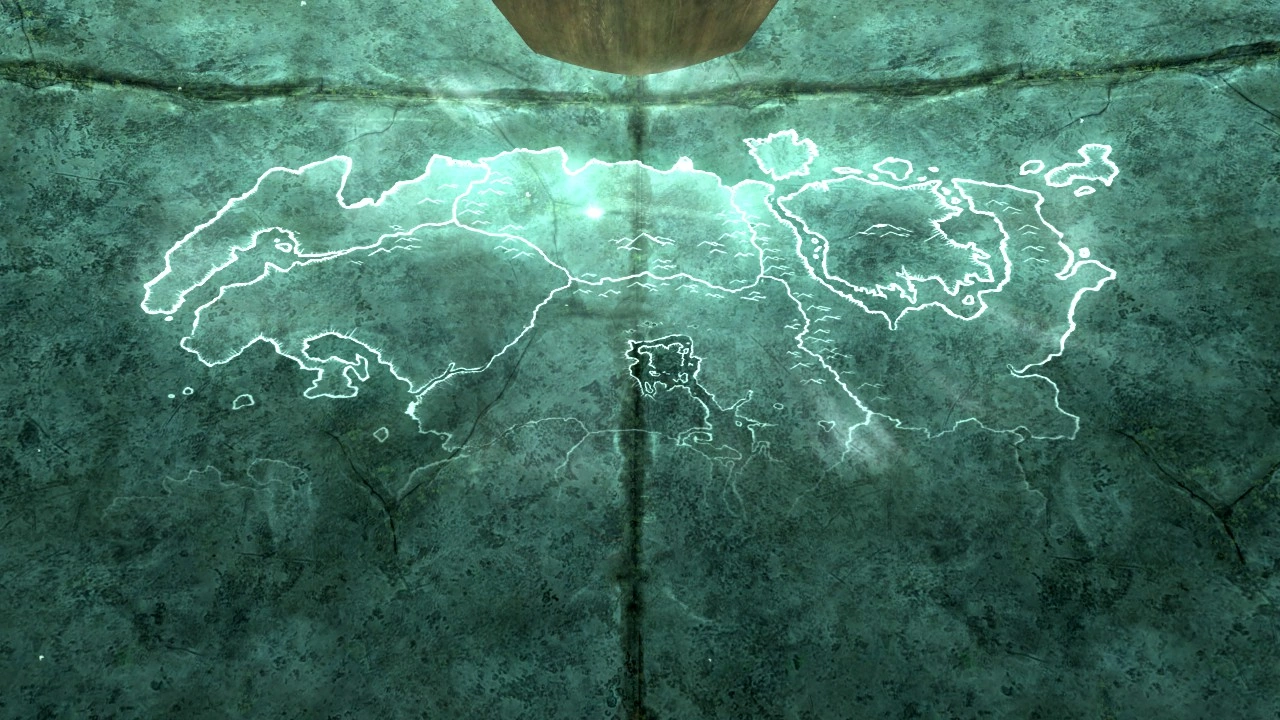
The Map Revealed[]
As a map of the northern part of Tamriel is projected onto the wall underneath the buttons, Decimius is initially excited to watch the results of his months of work. However, this is tempered slightly as the results come in: Something is creating a huge amount of interference, something at the College of Winterhold.
Speak to Decimius (and be as honest or as cagey as desired), but he is highly suspicious of the mages. He angrily wants to know what has been done at the College or what the College has to cause such an interference. Whether or not he is told about the Eye of Magnus, the conversation needs to be turned to the Staff of Magnus's location. Decimius finally reveals its location: Labyrinthian.
While leaving the Oculory room, Nerien, another representative from the Psijic Order, magically appears from a side corridor to say that trying times are ahead. It is imperative that a return be made to the College immediately. Swift action must be taken, and capabilities must be proven. He believes the Dragonborn will prevail.
Beyond the doors where Nerien was standing, another set of doors can be opened with the Observatory key. Once open, it is possible to fast travel back to the College.
Back at the College[]

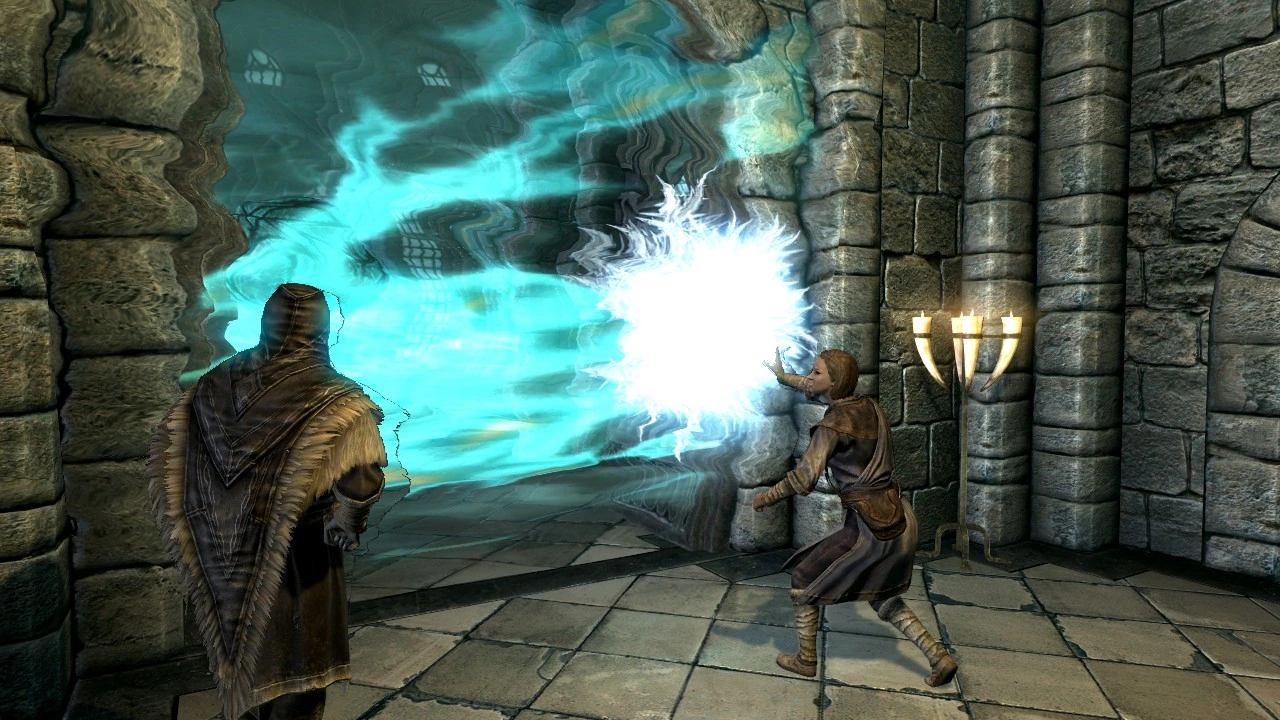
Mirabelle destroys Ancano's barrier
After arriving at the College, Savos Aren can be found in the Hall of the Elements. He refuses to talk about the Staff of Magnus because the Eye of Magnus has been taken over by Ancano, who has barricaded himself inside the room. Savos and Mirabelle hit the barrier with sparks and frost, respectively, and though fire does not need to be used to destroy the barrier, one might as well complete the trio. Note that, if Mirabelle is hit, she will not speak to Ancano, and the quest cannot continue. Once in the room with Ancano, a short cutscene unfolds where Savos attempts to speak to and stop Ancano, resulting in the screen going white. This ends this quest and begins the quest, "Containment."
Journal[]
| Revealing the Unseen – MG06 | |
|---|---|
| ID | Journal Entry |
| 10 | I've been asked to speak with Mirabelle Ervine to follow up on the Staff of Magnus.
|
| 20 | Mirabelle has told me that members of the Synod recently visited the College, mentioning the Staff of Magnus. They were last known to be heading towards Mzulft; they may know more about where to find the staff.
|
| 25 |
|
| 30 | At Mirabelle's suggestion, I entered the ruins of Mzulft searching for the Synod researchers. I found one man who died, and suggested that more people may be inside at something called The Oculory. I should head further into the ruins to see what's going on.
|
| 32 | At Mirabelle's suggestion, I entered the ruins of Mzulft searching for the Synod researchers. I found Paratus Decimius, who appears to be the only surviving member of the Synod expedition, and who has insisted that a "focusing crystal" is necessary to finish his experiment but was stolen by the Falmer. (if not in possession of the focusing crystal)
|
| 35 | Exploring Mzulft while looking for information about the Staff of Magnus, I've encountered Paratus Decimius, the sole surviving member of a Synod expedition. I've found the focusing crystal he needs to finish his experiment, and should return it to him.
|
| 37 |
|
| 40 | Paratus Decimius may know the location of the Staff of Magnus, but has asked for my help in completing an experiment in Mzulft. I need to follow him to the top of the ruins.
|
| 50 | Paratus Decimius may know the location of the Staff of Magnus, but has asked for my help in completing an experiment in Mzulft. I need to use magic to attenuate Paratus' focusing crystal, and then manipulate the dwarven machinery to line up the beams of light.
|
| 55 |
|
| 60 | Traveling to Mzulft in search of the Synod, I found Paratus Decimius who helped me learn that the Staff of Magnus is located in Labyrinthian. This information needs to get back to Savos Aren at the College immediately.
|
| 70 | After traveling to Mzulft and learning that the Staff of Magnus is located within Labyrinthian, I returned to the College to give the news to Arch-Mage Aren. Aren, however, is more concerned with the Eye of Magnus at the moment, since Ancano has locked himself in the Hall of the Elements with it. I need to help the Arch-Mage reach him at once.
|
| 200 | After finding the Synod in Mzulft, I learned that the Staff of Magnus can be found in Labyrinthian, and brought this news to the Arch-Mage.
|
Trivia[]
- If the Oculory puzzle is attempted during nighttime, there will be no beam, an issue that has been mistaken as a bug.
- When fighting the Centurion Sphere (Master), it might not get through the door because of its size, which can be used to an advantage.
- It can be useful for mages to do the quest "Out of Balance" for Drevis Neloren at the College of Winterhold, because of the bug that can sometimes give two hours of incredibly fast magicka regeneration, extremely useful against the dangers of Mzulft.
Bugs[]
|
This section contains bugs related to Revealing the Unseen (Skyrim). Before adding a bug to this list, consider the following:
|
| Click to show |
|---|
|
Achievements[]
 |
Revealing the Unseen Complete "Revealing the Unseen" |
|---|---|
| Points | 10 |
| Trophy |
Appearances[]
| College of Winterhold Quests | |
|---|---|
| Main Quest |
|
| Side Quests | |
| Master Spell Quests | |
| Radiant Quests | |
| Other Quests | |