(Added info in bugs section.) Tag: Visual edit |
Ottoman Hold (talk | contribs) No edit summary |
||
| (2 intermediate revisions by 2 users not shown) | |||
| Line 39: | Line 39: | ||
===Alchemy ingredients=== |
===Alchemy ingredients=== |
||
| − | *[[Deathbell]] |
+ | *[[Deathbell (Skyrim)|Deathbell]] |
*[[Nightshade (Skyrim)|Nightshade]] |
*[[Nightshade (Skyrim)|Nightshade]] |
||
*[[Red Mountain Flower]] |
*[[Red Mountain Flower]] |
||
| Line 60: | Line 60: | ||
==Bugs== |
==Bugs== |
||
{{Bugs}} |
{{Bugs}} |
||
| − | {| |
+ | {|class="wikitable mw-collapsible mw-collapsed" width="100%" data-expandtext="Show" data-collapsetext="Hide" |
!Click to see the list of bugs encountered |
!Click to see the list of bugs encountered |
||
|- |
|- |
||
| Line 80: | Line 80: | ||
*{{ALLPLAT}} Followers might not follow the Dragonborn out upon exiting the maze. |
*{{ALLPLAT}} Followers might not follow the Dragonborn out upon exiting the maze. |
||
**Exit the maze and fast travel to a different location, the follower should still appear at the destination with the Dragonborn. |
**Exit the maze and fast travel to a different location, the follower should still appear at the destination with the Dragonborn. |
||
| − | *In the Czech, French, Spanish, Italian, German, Polish and Russian versions of the game, a bug prevents finishing this quest. Even if the correct spell is cast on the right sigil, nothing happens |
+ | *{{ALLPLAT}} In the Czech, French, Spanish, Italian, German, Polish and Russian versions of the game, a bug prevents finishing this quest. Even if the correct spell is cast on the right sigil, nothing happens. |
| − | **{{XBOX360}} |
+ | **{{PC|Fix}}{{XBOX360|Fix}}{{PS3|Fix}} This can be resolved by changing the game's language to English. |
| + | **{{PC|Fix}} The [[Console Commands (Skyrim)|console command]] <code>tcl</code> can be used, which toggles collisions with environment off and on. This will allow the floor to be bypassed. |
||
| + | **{{XBOX360}} This is fixed as of Patch 1.9 in the Italian version. |
||
*{{XBOX360}}{{PS3}} When approaching the raised step outside the maze where the staves rise from the holes, sometimes fewer than four or even no staves rise (tested several times). Simply using alternate spells or reloading will fix this. |
*{{XBOX360}}{{PS3}} When approaching the raised step outside the maze where the staves rise from the holes, sometimes fewer than four or even no staves rise (tested several times). Simply using alternate spells or reloading will fix this. |
||
**{{XBOX360}} Followers can pick up the staves without any prompting. If one or two staves are missing and a follower is nearby, check their inventory to see if the missing staff/staves are there. |
**{{XBOX360}} Followers can pick up the staves without any prompting. If one or two staves are missing and a follower is nearby, check their inventory to see if the missing staff/staves are there. |
||
Revision as of 18:11, 6 September 2020
Shalidor's Maze is a landmark located at the ancient Nordic city of Labyrinthian. The entrance is located directly east of the Bromjunaar Sanctuary. Traversing this maze results in a fight with a Dremora and a word for the Dismay Dragon Shout.
Background
Shalidor's Maze was constructed by Arch-Mage Shalidor during the First Era in the ruins of the ancient Nordic city of Bromjunaar as a testing ground for new Archmages. The test consisted of navigating the ruins in order to reach the labyrinth and traversing the labyrinth itself, if the journey was survived.[1]
Walkthrough
Just inside the entrance, there is a charred corpse holding a soul gem in one hand and a Tattered Note in the other. Upon nearing the corpse, four staves rise out of slots in the ground. The note reads:
"Enter Twice - Exit Only Once.
Alteration will lead you to Destruction.
Only Illusion shows the way to Restoration.
Conjure not, but be conjured instead."
Take all four staves, walk straight forward. There is a sigil of Alteration. Use the Staff of Magelight or cast any projectile Alteration spell (Magelight, Paralyze, etc.) on the sigil to lower the gate. Inside the corridors are shutters that act as chests in this area, and allow the Dragonborn to see through the maze.
Using the shutters inside the maze as markers to tell what areas have been explored by opening and closing them is not necessary.
After running through a few corridors, opening the shutters in the corners on the way, there will be a Destruction sigil. Cast any projectile Destruction spell on it or use the Staff of Firebolts to open the trap door below to continue.
At the bottom of the trap door, a sigil of Conjuration is to the left. For now, it cannot be activated. Continue forward. A staircase will slide down like an elevator - taking it will result in placing the Dragonborn back outside near where the four staves appeared. Follow either side of the maze to get to the back. In the back there will be a dragon word wall for the shout Dismay.
Trial of Conjuration
Turn around and enter the back exit of the maze, to find the sigil for Illusion. Cast a projectile Illusion spell or use the Staff of Fear to open this gate. Follow the corridors, opening the shutters in the corners, until the sigil of Restoration is reached. Cast a projectile Restoration spell (Healing Hands or Heal Other does not count) or use the Staff of Repulsion to open the trap door.
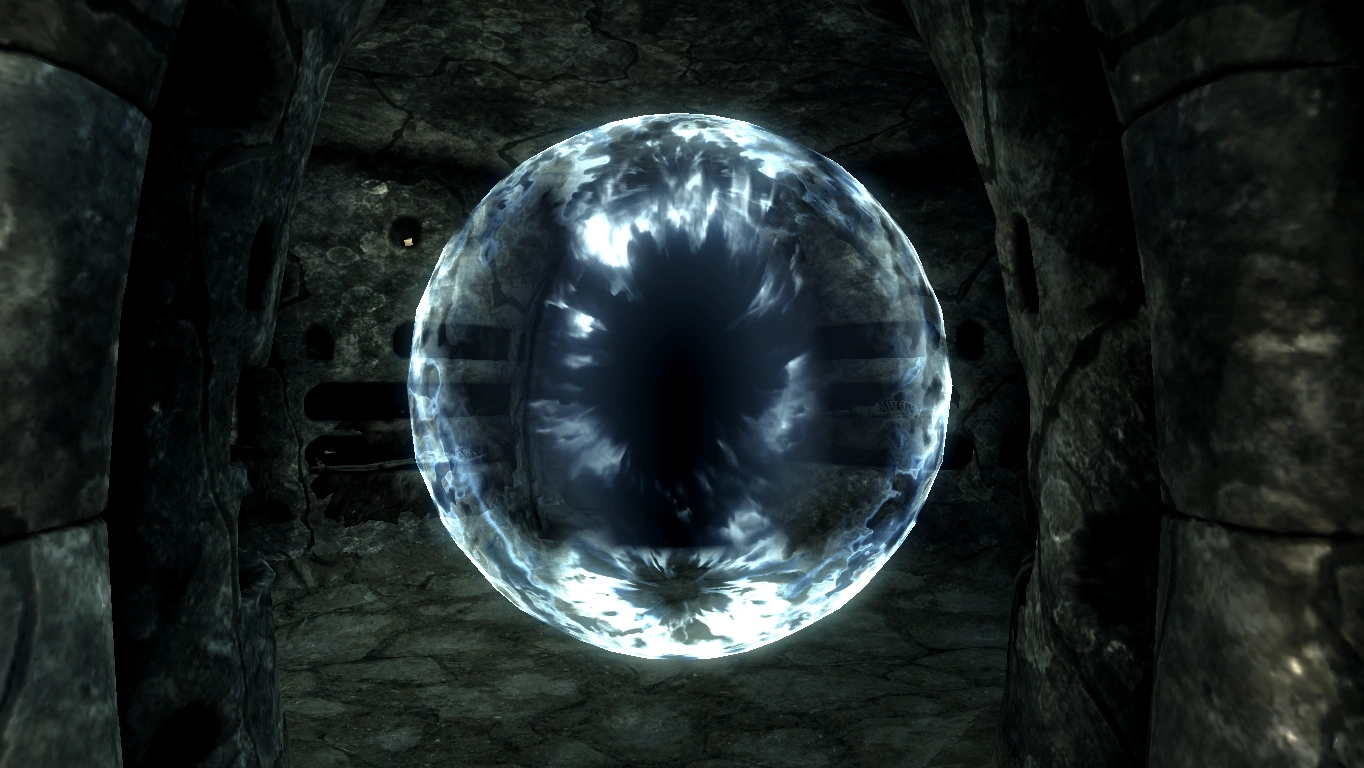
Here there is a portal to the "Trials of Conjuration" if all of the sigils in the maze have been activated. A leveled Dremora is waiting on the other side and attacks the Dragonborn on sight. When attacked, the two are teleported back to where the staves were, where the Dragonborn is attacked by the Dremora and leveled Atronachs. After defeating them, the Diadem of the Savant may be taken from the Dremora's corpse.
Enemies
- Skeevers
- One Ice Wraith
- Leveled Dremora
- Leveled atronachs (flame, frost, or storm atronachs)
Notable items
General loot
- Liminal Bridges (Conjuration skill book)
- Spell Tome: Heal Other
- Diadem of the Savant, a crown that makes all spells cost 5% less Magicka to cast
- Centurion Dynamo Core, found behind one of the Shutters
- Leveled Mace, on the ledge on the right side. Can be obtained by climbing the left side of the stairs, then jumping onto the ledge and running around until on the right side. It is also accompanied by a skeleton and a leveled shield.
Alchemy ingredients
- Deathbell
- Nightshade
- Red Mountain Flower
- Dragon's Tongue
- Blue Mountain Flower
- Two samples of salts from the summoned atronachs (fire, frost, or void salts)
Trivia
- One does not have to go through the maze and the four trials to access the word wall, as it is possible to simply walk around the maze to reach the wall.
- It is possible to jump or use Whirlwind Sprint to reach the top of the structure surrounding the area to the west. There is a chest and, on the other side, a skeleton with a leveled mace.
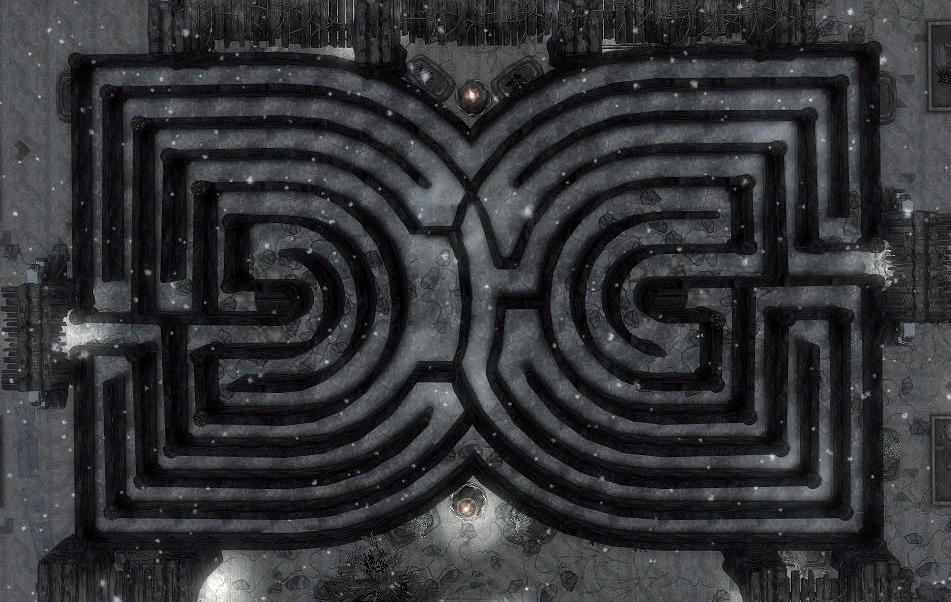
- It is a unicursal maze, meaning there is only one path to follow. This type of maze is also known as a labyrinth, giving the ruin its name.
- It is possible to one hit the Dremora Kynval and be teleported back to the start and unable to loot the body, due to it still being in Trials of Conjuration.
- It is not necessary to use the enchanted staves to activate the sigils. E.g. Calm can be used on the Illusion sigil instead of Fear, and presumably any targeted spell from the proper school will work, except for Restoration. For Restoration, "Healing Hands" and "Heal Other" don't work - "Repel Lesser Undead," however, will. The difference is that the spell fires a projectile, which is the case for the latter spell, but not the former ones.
- A Destruction spell may also open the Restoration sigil.
- Even though Shalidor's Maze was constructed as a test for Archmages, completing it doesn't require any previous magical abilities or knowledge, as spells required for it are given in the form of staves.
- Followers can get trapped in the area. It is safer to leave them outside.
- From an aerial view, the shape of the maze appears to resemble an hourglass. Interestingly, there exists an "hourglass riddle" during the "Labyrinthian" in Arena. The same riddle also appears during an Oblivion quest, "The Rosethorn Cache."
- One of the shutters within the maze hides a severed head with a gold coin in its mouth. This is reminiscent of Charon's Obol, the ancient Greek and Roman custom of placing a coin in the mouth of the deceased prior to burial.
Bugs
|
This section contains bugs related to Shalidor's Maze. Before adding a bug to this list, consider the following:
|
| Click to see the list of bugs encountered |
|---|
|