No edit summary |
No edit summary Tag: Source edit |
||
| (37 intermediate revisions by 19 users not shown) | |||
| Line 1: | Line 1: | ||
{{SkyrimQuests |
{{SkyrimQuests |
||
|image = Under saarthal.jpg |
|image = Under saarthal.jpg |
||
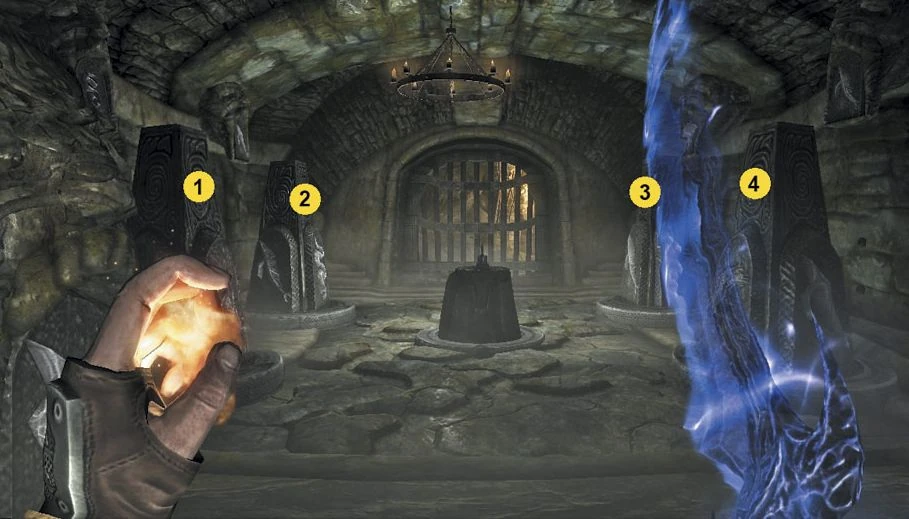
| + | |caption = The mysterious orb in Saarthal. |
||
|questgiver = [[Tolfdir (Skyrim)|Tolfdir]] |
|questgiver = [[Tolfdir (Skyrim)|Tolfdir]] |
||
|location = [[Saarthal]] |
|location = [[Saarthal]] |
||
| Line 7: | Line 8: | ||
|reward = [[Staff of Magelight]] |
|reward = [[Staff of Magelight]] |
||
|faction = [[College of Winterhold (Skyrim)|College of Winterhold]] |
|faction = [[College of Winterhold (Skyrim)|College of Winterhold]] |
||
| − | |type = [[Quests (Skyrim)#The College of Winterhold|College of Winterhold |
+ | |type = [[Quests (Skyrim)#The College of Winterhold|College of Winterhold main quest]] |
|QuestID = MG02 |
|QuestID = MG02 |
||
}} |
}} |
||
| − | '''Under Saarthal''' is a [[Quests (Skyrim)|quest]] available in {{Skyrim}} |
+ | '''Under Saarthal''' is a [[Quests (Skyrim)|quest]] available in {{Skyrim}} and is the second quest in the [[College of Winterhold (Skyrim)|College of Winterhold]]'s quest line in which the [[Last Dragonborn|Dragonborn]] must explore the ancient [[Nord|Nordic]] ruins of [[Saarthal]] with the other members of [[Tolfdir (Skyrim)|Tolfdir]]'s class as part of an educational and research expedition. This quest is also mandatory if the side quest "[[Forbidden Legend]]" is to be completed. |
| + | |||
| + | ==Background== |
||
| + | <div class="blockquote-half"> |
||
| ⚫ | |||
| + | </div> |
||
==Objectives== |
==Objectives== |
||
| − | #Meet |
+ | #Meet Tolfdir outside Saarthal |
| − | #Follow Tolfdir |
+ | #Follow Tolfdir |
| − | #Find [[Arniel Gane]] |
+ | #Find [[Arniel Gane]] |
| − | #Use the [[Saarthal Amulet]] to escape the trap |
+ | #Use the [[Saarthal Amulet]] to escape the trap |
| − | #Follow Tolfdir |
+ | #Follow Tolfdir |
| − | #Tell Tolfdir about the vision |
+ | #Tell Tolfdir about the vision |
| − | #Follow Tolfdir |
+ | #Follow Tolfdir |
| − | #Find danger within |
+ | #Find danger within Saarthal |
| − | #Talk to the [[Arch-Mage]] |
+ | #Talk to the [[Savos Aren|Arch-Mage]] |
==Walkthrough== |
==Walkthrough== |
||
| ⚫ | |||
| ⚫ | |||
| ⚫ | Tolfdir's class meets outside the ruins of |
||
| ⚫ | |||
After some touring inside, Tolfdir will ask the Dragonborn to find [[Arniel Gane]] (one can simply run ahead to the quest marker and speak to Arniel without waiting for Tolfdir). |
After some touring inside, Tolfdir will ask the Dragonborn to find [[Arniel Gane]] (one can simply run ahead to the quest marker and speak to Arniel without waiting for Tolfdir). |
||
| − | The Dragonborn must now find |
+ | The Dragonborn must now find four artifacts, one of which is the [[Saarthal Amulet]]. The other three are very small and hard to see [[Enchanted Ring (Skyrim)|Enchanted Rings]], but clearly marked on the quest indicator as long as they are taken before the Amulet, or else the quest markers will disappear. The artifacts do not have to be returned to Arniel and can be kept. |
| − | Retrieving the Saarthal Amulet will trap the Dragonborn. Escape can be achieved by equipping the amulet and casting any spell ([[Dragon Shouts|Shouts]] such as [[Unrelenting Force (Skyrim)|Unrelenting Force]] are also effective) on the tablet from which it originally came. (Tolfdir will approach outside the trapped area and suggest using the amulet if the Dragonborn should try to return to Arniel.) The tablet will break into pieces, revealing a passage and removing the blocking gates. |
+ | Retrieving the Saarthal Amulet will trap the Dragonborn. Escape can be achieved by equipping the amulet and casting any spell ([[Dragon Shouts|Shouts]] such as [[Unrelenting Force (Skyrim)|Unrelenting Force]] and [[Staves (Skyrim)|staves]] such as the [[Wabbajack (Skyrim)|Wabbajack]] are also effective) on the tablet from which it originally came. (Tolfdir will approach outside the trapped area and suggest using the amulet if the Dragonborn should try to return to Arniel.) The tablet will break into pieces, revealing a passage and removing the blocking gates. |
| − | Tolfdir will then take the lead. When he gets to the room at the end of the passage, |
+ | Tolfdir will then take the lead. When he gets to the room at the end of the passage, [[Nerien]], a member of the [[Psijic Order (Skyrim)|Psijic Order]], will appear in a vision, which only the Dragonborn will see. After talking to Tolfdir about the vision, the Dragonborn will have to deal with [[Draugr (Skyrim)|draugr]] that appear from the three coffins in the room. The draugr can be killed with little or no risk of injury using [[Archery (Skyrim)|archery]]; Tolfdir cannot be killed, so an effective tactic would be to shoot the draugr attacking him. If Tolfdir is knocked down the draugr will likely switch their attacks to the Dragonborn until Tolfdir gets up again. |
| − | The Dragonborn should then follow Tolfdir to a barred gate in a room. The lever to open the gate is on the right; the room beyond holds more draugr to be dealt with. |
+ | Tolfdir will pass through the middle coffin and The Dragonborn should then follow Tolfdir to a barred gate in a room. Tolfdir will stop and wait there and do nothing until the Dragonborn pulls the lever and opens the gate. The lever to open the gate is on the right; the room beyond holds more draugr to be dealt with. Both will lead into a large room where four draugr will arise from their wall crypts. The Dragonborn must help Tolfdir slay all of them (again, good [[Sneak (Skyrim)|Sneak]] and Archery can help the Dragonborn remain unnoticed and unharmed). |
The two chains, one on each side of the gate, open the way to the next area. |
The two chains, one on each side of the gate, open the way to the next area. |
||
| − | ===Saarthal |
+ | ===Saarthal proper=== |
| − | There are a number of inconveniently placed [[ |
+ | There are a number of inconveniently placed [[Traps (Skyrim)|traps]] that have the potential to provide a great deal of problems for some of the Dragonborn's [[Followers (Skyrim)|followers]], especially [[Dog (Skyrim)|dogs]]. Most are pressure pads, so they can be avoided with some caution. The swinging pendulums are also difficult for followers to navigate, so keep healing spells handy or be ready to wait. |
Ideally the Dragonborn should proceed alone, killing draugr as necessary. In a large room, there is a draugr, a rune trap, and two more draugr. An effective tactic would be to kill the first draugr and get the attention of the next two, so that when they approach, the trap can be triggered to damage them. |
Ideally the Dragonborn should proceed alone, killing draugr as necessary. In a large room, there is a draugr, a rune trap, and two more draugr. An effective tactic would be to kill the first draugr and get the attention of the next two, so that when they approach, the trap can be triggered to damage them. |
||
| − | ==== |
+ | ====First pillar puzzle==== |
After several more rooms and traps, there will be a door on the second floor near a broken coffin. Beyond there is a puzzle with six different movable pillars. The correct position for each pillar is shown on the wall directly behind and above them. This fact could easily be missed if the Dragonborn were not up close to the pillars. The [[Candlelight (Skyrim)|Candlelight]] spell (or [[Night Eye (Skyrim)|Night Eye]]) makes them easier to see. Once the pillars are properly set, the lever can be activated to open the gate. |
After several more rooms and traps, there will be a door on the second floor near a broken coffin. Beyond there is a puzzle with six different movable pillars. The correct position for each pillar is shown on the wall directly behind and above them. This fact could easily be missed if the Dragonborn were not up close to the pillars. The [[Candlelight (Skyrim)|Candlelight]] spell (or [[Night Eye (Skyrim)|Night Eye]]) makes them easier to see. Once the pillars are properly set, the lever can be activated to open the gate. |
||
In the next room there are two wooden ramps. As the Dragonborn nears the top of either one, a [[Draugr Deathlord (Skyrim)|Draugr Deathlord]], [[Draugr Wight (Skyrim)|Draugr Wight]] or [[Draugr Scourge (Skyrim)|Draugr Scourge]] ([[Leveled Creatures (Skyrim)|level dependent]]) arise. An effective tactic would be to lure the draugr back to the pillar puzzle room and shut the gate. The Dragonborn would then be able to shoot [[Arrows (Skyrim)|arrows]] at the enemy whenever it appears from around the corner. The nearby coffin also makes a fine obstacle against melee, though you need to then pursue and kite him back to the coffin as he attempts to recover. Alternatively, a high Sneak skill and a potion of invisibility could be combined to sneak through the door near the top of the ramp, and close it. Provided the Dragonborn were quiet, the draugr would almost certainly remain unaware. There is a chest and other items to loot here. Beyond an iron door, there are two rune traps to pass. Activating either trap using a shout or magic will make noise and attract the draugr, while walking over the traps will not. The first rune trap can be easily avoided by walking around it, while the second rune trap in the doorway can be avoided by using any type of magic on it, or jumping over it. Passing over the second trap means the draugr is ultimately evaded. |
In the next room there are two wooden ramps. As the Dragonborn nears the top of either one, a [[Draugr Deathlord (Skyrim)|Draugr Deathlord]], [[Draugr Wight (Skyrim)|Draugr Wight]] or [[Draugr Scourge (Skyrim)|Draugr Scourge]] ([[Leveled Creatures (Skyrim)|level dependent]]) arise. An effective tactic would be to lure the draugr back to the pillar puzzle room and shut the gate. The Dragonborn would then be able to shoot [[Arrows (Skyrim)|arrows]] at the enemy whenever it appears from around the corner. The nearby coffin also makes a fine obstacle against melee, though you need to then pursue and kite him back to the coffin as he attempts to recover. Alternatively, a high Sneak skill and a potion of invisibility could be combined to sneak through the door near the top of the ramp, and close it. Provided the Dragonborn were quiet, the draugr would almost certainly remain unaware. There is a chest and other items to loot here. Beyond an iron door, there are two rune traps to pass. Activating either trap using a shout or magic will make noise and attract the draugr, while walking over the traps will not. The first rune trap can be easily avoided by walking around it, while the second rune trap in the doorway can be avoided by using any type of magic on it, or jumping over it. Passing over the second trap means the draugr is ultimately evaded. |
||
| − | ==== |
+ | ====Second pillar puzzle==== |
| − | [[File:Solution spinning puzzle pillar.jpg|thumb|200px]] |
+ | [[File:Solution spinning puzzle pillar.jpg|thumb|200px|Solution to the second pillar puzzle.]] |
| − | There are four pillars that give you the solution to the spinning puzzle pillars ahead. The second pillar on the left should be turned to whale first (because it turns the other three with it.) Then, the first pillar on the left should be turned to snake (that will turn the two on the right.) Next, the second pillar on the right should be turned to |
+ | There are four pillars that give you the solution to the spinning puzzle pillars ahead. The second pillar on the left should be turned to whale first (because it turns the other three with it.) Then, the first pillar on the left should be turned to snake (that will turn the two on the right.) Next, the second pillar on the right should be turned to hawk (that one will turn the last one.) And finally, the first one on the right should be turned to whale. |
| + | |||
====Final battle==== |
====Final battle==== |
||
After passing through the gate, Tolfdir will reappear. There is an [[Alchemy Lab (Skyrim)|Alchemy Lab]] in the north side of the room. Take caution, however, as there is also a poison dart trap trigger in the center of the floor. |
After passing through the gate, Tolfdir will reappear. There is an [[Alchemy Lab (Skyrim)|Alchemy Lab]] in the north side of the room. Take caution, however, as there is also a poison dart trap trigger in the center of the floor. |
||
| ⚫ | Through another iron door, in the final room, approaching the glowing will summon the draugr-shape of [[Jyrik Gauldurson]]. Initially, Jyrik is invulnerable, but after about 30 seconds, Tolfdir is able to weaken Jyrik by casting a spell on the glowing orb in the room, allowing the Dragonborn to deal damage. Jyrik can be a very difficult foe for a lower-level Dragonborn, as he knows a variety of [[Destruction (Skyrim)|Destruction]] spells, and wields an [[Ancient Nord War Axe]] with a frost enchantment on it. |
||
| ⚫ | Through another iron door, in the final room, approaching the glowing orb will summon the draugr-shape of [[Jyrik Gauldurson]]. Initially, Jyrik is invulnerable, but after about 30 seconds, Tolfdir is able to weaken Jyrik by casting a spell on the glowing orb in the room, allowing the Dragonborn to deal damage. Jyrik can be a very difficult foe for a lower-level Dragonborn, as he knows a variety of [[Destruction (Skyrim)|Destruction]] spells, and wields an [[Ancient Nord War Axe]] with a frost enchantment on it. He also sports an elemental cloak that changes between fire, ice, and lightning, rendering him immune to Destruction spells of that element while the cloak is active. |
||
| ⚫ | Jyrik Gauldurson is powerful, on the level of a [[Draugr Deathlord (Skyrim)|Draugr Deathlord]]. If the Dragonborn possesses good sneaking and archery skills, he can be defeated without risk. The Dragonborn should stay on the balcony, standing close enough to see the floor below without standing near the balcony's edge, and shoot Jyrik with arrows. He will run up to the balcony, but will only run along the edge and will fail to spot the Dragonborn; enough arrows and he will eventually perish. |
||
| + | |||
| ⚫ | Jyrik Gauldurson is powerful, on the level of a [[Draugr Deathlord (Skyrim)|Draugr Deathlord]]. If the Dragonborn possesses good sneaking and archery skills, he can be defeated without risk. The Dragonborn should stay on the balcony, standing close enough to see the floor below without standing near the balcony's edge, and shoot Jyrik with arrows. He will run up to the balcony, but will only run along the edge and will fail to spot the Dragonborn; enough arrows and he will eventually perish. This requires a very high Sneak skill, as he will notice the movement of the Dragonborn otherwise. |
||
| + | |||
| + | Another alternate strategy can be achieved very quickly by utilizing the game's mechanics to the Dragonborn's advantage. Wait until Jyrik Gauldurson charges the balcony. As he comes up the stairs, use the full force "Unrelenting Force" shout to knock him off the balcony. He suffers massive damage, aproximately 40%, from this fall. Hit him with a few arrows or spells, anything ranged. Wait until the shout recharges, then lure him up again and repeat. This should work after only two shouts. |
||
| − | ==== |
+ | ====Conclusion==== |
| − | Jyrik's corpse bears a [[Gauldur Amulet Fragment|fragment of the Gauldur Amulet]] and the [[Writ of Sealing]]. The writ, when read, will start the quest "[[Forbidden Legend]]", if it has not been previously started. The Dragonborn should talk with Tolfdir to advance to the next stage of the quest (Return to the College). The [[Staff of Jyrik Gauldurson]], which is on the altar, is an artifact worth collecting. Through the door behind the artifact and down to the garden is a [[Word Wall]] with the Dragon shout [[Ice Form]], as well as a chest with [[Random Loot (Skyrim)|leveled loot]]. Upon finally leaving Saarthal, the Dragonborn should travel back to the college to find |
+ | Jyrik's corpse bears a [[Gauldur Amulet Fragment|fragment of the Gauldur Amulet]] and the [[Writ of Sealing]]. The writ, when read, will start the quest "[[Forbidden Legend]]", if it has not been previously started. The Dragonborn should talk with Tolfdir to advance to the next stage of the quest (Return to the College). The [[Staff of Jyrik Gauldurson]], which is on the altar, is an artifact worth collecting. Through the door behind the artifact and down to the garden is a [[Word Walls (Skyrim)|Word Wall]] with the Dragon shout [[Ice Form]], as well as a chest with [[Random Loot (Skyrim)|leveled loot]]. Upon finally leaving Saarthal, the Dragonborn should travel back to the college to find Arch-Mage Savos Aren and inform him of the discovery. He will usually be found upstairs in his personal quarters. The Arch-Mage will reward the Dragonborn with the [[Staff of Magelight]], and the quest "[[Hitting the Books]]" will start. |
==Journal== |
==Journal== |
||
| − | {| |
+ | {|class="skqtable" |
| − | ! |
+ | !colspan="2"|Under Saarthal – MG02 |
|- |
|- |
||
!ID!!Journal Entry |
!ID!!Journal Entry |
||
|- |
|- |
||
| + | |align="center"|0||''Tolfdir has decided to take us to investigate the ruins of Saarthal to explore the more practical uses of magic.'' |
||
| − | | align="center" |0 |
||
| ⚫ | |||
|- |
|- |
||
| ⚫ | |||
| − | | align="center" |10 |
||
| ⚫ | |||
*'''Objective 10:''' Meet Tolfdir outside Saarthal |
*'''Objective 10:''' Meet Tolfdir outside Saarthal |
||
|- |
|- |
||
| − | | |
+ | |align="center"|20|| |
| − | | |
||
*'''Objective 20:''' Follow Tolfdir |
*'''Objective 20:''' Follow Tolfdir |
||
|- |
|- |
||
| ⚫ | |||
| − | | align="center" |25 |
||
| ⚫ | |||
*'''Objective 25:''' Find Arniel Gane |
*'''Objective 25:''' Find Arniel Gane |
||
|- |
|- |
||
| ⚫ | |||
| − | | align="center" |30 |
||
| ⚫ | |||
| ⚫ | |||
| ⚫ | |||
|- |
|- |
||
| ⚫ | |||
| − | | align="center" rowspan="2" |40 |
||
| ⚫ | |||
* '''Objective 35:''' Use the Saarthal Amulet to escape the trap |
* '''Objective 35:''' Use the Saarthal Amulet to escape the trap |
||
|- |
|- |
||
|''While exploring the excavation in Saarthal, I somehow triggered some sort of trap. It has revealed an unexplored section of the ruins, and Tolfdir would like me to follow him further in.'' |
|''While exploring the excavation in Saarthal, I somehow triggered some sort of trap. It has revealed an unexplored section of the ruins, and Tolfdir would like me to follow him further in.'' |
||
| − | * '''Objective 40: |
+ | * '''Objective 40:''' Follow Tolfdir |
|- |
|- |
||
| ⚫ | |||
| − | | align="center" |50 |
||
| ⚫ | |||
*'''Objective 50:''' Tell Tolfdir about the vision |
*'''Objective 50:''' Tell Tolfdir about the vision |
||
|- |
|- |
||
| ⚫ | |||
| − | | align="center" |60 |
||
| ⚫ | |||
*'''Objective 60:''' Follow Tolfdir |
*'''Objective 60:''' Follow Tolfdir |
||
*'''Objective 65:''' Find the danger within Saarthal |
*'''Objective 65:''' Find the danger within Saarthal |
||
|- |
|- |
||
| ⚫ | |align="center"|70||''During an expedition to Saarthal, I uncovered a new section of the ruins, and was warned by a vision from someone in the Psijic Order of danger within. Despite this, Tolfdir and I have explored further and found a strange orb buried deep within Saarthal. Tolfdir has asked that I take news of the discovery to the Arch-Mage.'' |
||
| − | | align="center" |70 |
||
| ⚫ | |''During an expedition to Saarthal, I uncovered a new section of the ruins, and was warned by a vision from someone in the Psijic Order of danger within. Despite this, Tolfdir and I have explored further and found a strange orb buried deep within Saarthal. Tolfdir has asked that I take news of the discovery to the Arch-Mage.'' |
||
*'''Objective 70:''' Talk to the Arch-Mage |
*'''Objective 70:''' Talk to the Arch-Mage |
||
|- |
|- |
||
| ⚫ | |||
| − | | align="center" |200 |
||
| ⚫ | |||
*<u>Quest complete</u> |
*<u>Quest complete</u> |
||
|} |
|} |
||
| Line 114: | Line 114: | ||
*After completing the quest, [[Hold Guard]]s will comment on how ''"Saarthal is a place for Nord dead, not the mages' weird experiments".'' |
*After completing the quest, [[Hold Guard]]s will comment on how ''"Saarthal is a place for Nord dead, not the mages' weird experiments".'' |
||
*Taking the Gauldur Amulet Fragment off Jyrik Gauldurson's corpse will activate the quest "[[Forbidden Legend]]" if the Dragonborn has not already read [[Lost Legends]] or a [[Writ of Sealing]]. |
*Taking the Gauldur Amulet Fragment off Jyrik Gauldurson's corpse will activate the quest "[[Forbidden Legend]]" if the Dragonborn has not already read [[Lost Legends]] or a [[Writ of Sealing]]. |
||
| + | *After completing the quest, the Dragonborn may offer one of the other college students to become a follower. |
||
==Bugs== |
==Bugs== |
||
| Line 125: | Line 126: | ||
*Sometimes outside Saarthal, Tolfdir may think there is an enemy nearby and wander off. There is a chance he cannot be found again, thus rendering the quest unable to be completed. |
*Sometimes outside Saarthal, Tolfdir may think there is an enemy nearby and wander off. There is a chance he cannot be found again, thus rendering the quest unable to be completed. |
||
*Upon entering Saarthal, after Tolfdir goes through the door, he can sometimes end up in a completely random part of the world. After [[wait]]ing a day, he reappears inside the dungeon. |
*Upon entering Saarthal, after Tolfdir goes through the door, he can sometimes end up in a completely random part of the world. After [[wait]]ing a day, he reappears inside the dungeon. |
||
| − | *{{ALLPLAT}} In the room where Tolfdir stays and the Dragonborn moves on alone, the door has some kind of invisible wall in front of it and cannot be activated to the next zone. Reloading the autosave fixed it. On PC open the console "~" and type <code>tcl</code> to turn collision off. After getting through just re-open the console and repeat thus turning collision back on. |
+ | *{{ALLPLAT}}{{NX}} In the room where Tolfdir stays and the Dragonborn moves on alone, the door has some kind of invisible wall in front of it and cannot be activated to the next zone. Reloading the autosave fixed it. On PC open the console "~" and type <code>tcl</code> to turn collision off. After getting through just re-open the console and repeat thus turning collision back on. |
| + | **{{NX|Fix}} walk over to the chain that moves the spikes and use whirlwind spirit facing the door as the spikes rise. Best save before atemping this just incase the door remains blocked. |
||
*When taking the [[Saarthal Amulet]] and moving any direction immediately after, the amulet will not freeze the Dragonborn. The game will progress normally even so. |
*When taking the [[Saarthal Amulet]] and moving any direction immediately after, the amulet will not freeze the Dragonborn. The game will progress normally even so. |
||
*The door on which the Saarthal Amulet is found may cause the game to crash when a spell is cast on it. This occurs while the Dragonborn is trapped in the room and Tolfdir is watching. |
*The door on which the Saarthal Amulet is found may cause the game to crash when a spell is cast on it. This occurs while the Dragonborn is trapped in the room and Tolfdir is watching. |
||
| Line 172: | Line 174: | ||
*{{PC}} After picking up the Saarthal amulet, it may not be listed in the inventory, making it impossible to progress in the quest. |
*{{PC}} After picking up the Saarthal amulet, it may not be listed in the inventory, making it impossible to progress in the quest. |
||
*Sometimes [[Tolfdir (Skyrim)|Tolfdir]] and the class will be stuck up and around the ice hill, fighting an ice wolf. He seems unable to defeat it so will stay there indefinitely until the enemy is killed for him. Once the enemy is dead, go to the quest marker and wait several hours. Tolfdir should appear, starting the next phase of the quest. |
*Sometimes [[Tolfdir (Skyrim)|Tolfdir]] and the class will be stuck up and around the ice hill, fighting an ice wolf. He seems unable to defeat it so will stay there indefinitely until the enemy is killed for him. Once the enemy is dead, go to the quest marker and wait several hours. Tolfdir should appear, starting the next phase of the quest. |
||
| + | *In the room where the Dragonborn meets Nerien, Tolfdir may remain stuck in place and unable to open the coffins. This keeps the quest from progressing. |
||
| + | **Leaving the area through a load screen and re-entering seems to fix this.{{Conf}} |
||
|} |
|} |
||
| + | ==Appearances== |
||
| − | {{College of Winterhold Quests}} |
||
| + | *{{Skyrim}} |
||
| + | |||
| + | {{SkyrimCollegeOfWinterholdQuests}} |
||
<!--Interwiki links--> |
<!--Interwiki links--> |
||
[[de:Unter Saarthal]] |
[[de:Unter Saarthal]] |
||
[[es:En las entrañas de Saarthal]] |
[[es:En las entrañas de Saarthal]] |
||
| + | [[fr:Sous Saarthal]] |
||
| ⚫ | |||
[[it:Nei Meandri di Saarthal]] |
[[it:Nei Meandri di Saarthal]] |
||
[[pl:Zadanie:W podziemiach Saarthal]] |
[[pl:Zadanie:W podziemiach Saarthal]] |
||
| ⚫ | |||
Latest revision as of 01:16, 3 November 2023
Under Saarthal is a quest available in The Elder Scrolls V: Skyrim and is the second quest in the College of Winterhold's quest line in which the Dragonborn must explore the ancient Nordic ruins of Saarthal with the other members of Tolfdir's class as part of an educational and research expedition. This quest is also mandatory if the side quest "Forbidden Legend" is to be completed.
Background[]
Tolfdir has decided to take us to investigate the ruins of Saarthal to explore the more practical uses of magic.
Objectives[]
- Meet Tolfdir outside Saarthal
- Follow Tolfdir
- Find Arniel Gane
- Use the Saarthal Amulet to escape the trap
- Follow Tolfdir
- Tell Tolfdir about the vision
- Follow Tolfdir
- Find danger within Saarthal
- Talk to the Arch-Mage
Walkthrough[]
Tolfdir's class meets outside the ruins of Saarthal before beginning an academic exploration of the ruins. The Dragonborn may travel there with the other students as a group, and they will help deal with any bears or trolls encountered on the way.
Saarthal excavation[]
After some touring inside, Tolfdir will ask the Dragonborn to find Arniel Gane (one can simply run ahead to the quest marker and speak to Arniel without waiting for Tolfdir).
The Dragonborn must now find four artifacts, one of which is the Saarthal Amulet. The other three are very small and hard to see Enchanted Rings, but clearly marked on the quest indicator as long as they are taken before the Amulet, or else the quest markers will disappear. The artifacts do not have to be returned to Arniel and can be kept.
Retrieving the Saarthal Amulet will trap the Dragonborn. Escape can be achieved by equipping the amulet and casting any spell (Shouts such as Unrelenting Force and staves such as the Wabbajack are also effective) on the tablet from which it originally came. (Tolfdir will approach outside the trapped area and suggest using the amulet if the Dragonborn should try to return to Arniel.) The tablet will break into pieces, revealing a passage and removing the blocking gates.
Tolfdir will then take the lead. When he gets to the room at the end of the passage, Nerien, a member of the Psijic Order, will appear in a vision, which only the Dragonborn will see. After talking to Tolfdir about the vision, the Dragonborn will have to deal with draugr that appear from the three coffins in the room. The draugr can be killed with little or no risk of injury using archery; Tolfdir cannot be killed, so an effective tactic would be to shoot the draugr attacking him. If Tolfdir is knocked down the draugr will likely switch their attacks to the Dragonborn until Tolfdir gets up again.
Tolfdir will pass through the middle coffin and The Dragonborn should then follow Tolfdir to a barred gate in a room. Tolfdir will stop and wait there and do nothing until the Dragonborn pulls the lever and opens the gate. The lever to open the gate is on the right; the room beyond holds more draugr to be dealt with. Both will lead into a large room where four draugr will arise from their wall crypts. The Dragonborn must help Tolfdir slay all of them (again, good Sneak and Archery can help the Dragonborn remain unnoticed and unharmed).
The two chains, one on each side of the gate, open the way to the next area.
Saarthal proper[]
There are a number of inconveniently placed traps that have the potential to provide a great deal of problems for some of the Dragonborn's followers, especially dogs. Most are pressure pads, so they can be avoided with some caution. The swinging pendulums are also difficult for followers to navigate, so keep healing spells handy or be ready to wait.
Ideally the Dragonborn should proceed alone, killing draugr as necessary. In a large room, there is a draugr, a rune trap, and two more draugr. An effective tactic would be to kill the first draugr and get the attention of the next two, so that when they approach, the trap can be triggered to damage them.
First pillar puzzle[]
After several more rooms and traps, there will be a door on the second floor near a broken coffin. Beyond there is a puzzle with six different movable pillars. The correct position for each pillar is shown on the wall directly behind and above them. This fact could easily be missed if the Dragonborn were not up close to the pillars. The Candlelight spell (or Night Eye) makes them easier to see. Once the pillars are properly set, the lever can be activated to open the gate.
In the next room there are two wooden ramps. As the Dragonborn nears the top of either one, a Draugr Deathlord, Draugr Wight or Draugr Scourge (level dependent) arise. An effective tactic would be to lure the draugr back to the pillar puzzle room and shut the gate. The Dragonborn would then be able to shoot arrows at the enemy whenever it appears from around the corner. The nearby coffin also makes a fine obstacle against melee, though you need to then pursue and kite him back to the coffin as he attempts to recover. Alternatively, a high Sneak skill and a potion of invisibility could be combined to sneak through the door near the top of the ramp, and close it. Provided the Dragonborn were quiet, the draugr would almost certainly remain unaware. There is a chest and other items to loot here. Beyond an iron door, there are two rune traps to pass. Activating either trap using a shout or magic will make noise and attract the draugr, while walking over the traps will not. The first rune trap can be easily avoided by walking around it, while the second rune trap in the doorway can be avoided by using any type of magic on it, or jumping over it. Passing over the second trap means the draugr is ultimately evaded.
Second pillar puzzle[]
Solution to the second pillar puzzle.
There are four pillars that give you the solution to the spinning puzzle pillars ahead. The second pillar on the left should be turned to whale first (because it turns the other three with it.) Then, the first pillar on the left should be turned to snake (that will turn the two on the right.) Next, the second pillar on the right should be turned to hawk (that one will turn the last one.) And finally, the first one on the right should be turned to whale.
Final battle[]
After passing through the gate, Tolfdir will reappear. There is an Alchemy Lab in the north side of the room. Take caution, however, as there is also a poison dart trap trigger in the center of the floor.
Through another iron door, in the final room, approaching the glowing orb will summon the draugr-shape of Jyrik Gauldurson. Initially, Jyrik is invulnerable, but after about 30 seconds, Tolfdir is able to weaken Jyrik by casting a spell on the glowing orb in the room, allowing the Dragonborn to deal damage. Jyrik can be a very difficult foe for a lower-level Dragonborn, as he knows a variety of Destruction spells, and wields an Ancient Nord War Axe with a frost enchantment on it. He also sports an elemental cloak that changes between fire, ice, and lightning, rendering him immune to Destruction spells of that element while the cloak is active.
Jyrik Gauldurson is powerful, on the level of a Draugr Deathlord. If the Dragonborn possesses good sneaking and archery skills, he can be defeated without risk. The Dragonborn should stay on the balcony, standing close enough to see the floor below without standing near the balcony's edge, and shoot Jyrik with arrows. He will run up to the balcony, but will only run along the edge and will fail to spot the Dragonborn; enough arrows and he will eventually perish. This requires a very high Sneak skill, as he will notice the movement of the Dragonborn otherwise.
Another alternate strategy can be achieved very quickly by utilizing the game's mechanics to the Dragonborn's advantage. Wait until Jyrik Gauldurson charges the balcony. As he comes up the stairs, use the full force "Unrelenting Force" shout to knock him off the balcony. He suffers massive damage, aproximately 40%, from this fall. Hit him with a few arrows or spells, anything ranged. Wait until the shout recharges, then lure him up again and repeat. This should work after only two shouts.
Conclusion[]
Jyrik's corpse bears a fragment of the Gauldur Amulet and the Writ of Sealing. The writ, when read, will start the quest "Forbidden Legend", if it has not been previously started. The Dragonborn should talk with Tolfdir to advance to the next stage of the quest (Return to the College). The Staff of Jyrik Gauldurson, which is on the altar, is an artifact worth collecting. Through the door behind the artifact and down to the garden is a Word Wall with the Dragon shout Ice Form, as well as a chest with leveled loot. Upon finally leaving Saarthal, the Dragonborn should travel back to the college to find Arch-Mage Savos Aren and inform him of the discovery. He will usually be found upstairs in his personal quarters. The Arch-Mage will reward the Dragonborn with the Staff of Magelight, and the quest "Hitting the Books" will start.
Journal[]
| Under Saarthal – MG02 | |
|---|---|
| ID | Journal Entry |
| 0 | Tolfdir has decided to take us to investigate the ruins of Saarthal to explore the more practical uses of magic. |
| 10 | Tolfdir has asked the Apprentices to meet him at Saarthal, the site of an ongoing excavation by the College.
|
| 20 |
|
| 25 | In the College excavation at Saarthal, I've been asked to assist Arniel Gane with his work uncovering the ruins.
|
| 30 | I've been asked to assist Arniel Gane in his work at the excavation in Saarthal by collecting enchanted objects scattered around the ruins.
|
| 40 | While helping in the excavation in Saarthal by gathering enchanted items, I somehow triggered some sort of trap. It has revealed an unexplored section of the ruins, and Tolfdir would like me to follow him further in.
|
While exploring the excavation in Saarthal, I somehow triggered some sort of trap. It has revealed an unexplored section of the ruins, and Tolfdir would like me to follow him further in.
| |
| 50 | While following Tolfdir through an unexplored section of Saarthal, a vision from the Psijic Order has suggested that something has been set in motion by the exploration of Saarthal. Tolfdir should be warned.
|
| 60 | While in an unexplored area of Saarthal, I received a vision from someone in the Psijic Order saying there's something dangerous in Saarthal. Despite this, Tolfdir wishes to forge ahead and has asked that I follow him.
|
| 70 | During an expedition to Saarthal, I uncovered a new section of the ruins, and was warned by a vision from someone in the Psijic Order of danger within. Despite this, Tolfdir and I have explored further and found a strange orb buried deep within Saarthal. Tolfdir has asked that I take news of the discovery to the Arch-Mage.
|
| 200 | I've delivered word to the Arch-Mage that something interesting was found deep within Saarthal.
|
Trivia[]
- After completing the quest, Hold Guards will comment on how "Saarthal is a place for Nord dead, not the mages' weird experiments".
- Taking the Gauldur Amulet Fragment off Jyrik Gauldurson's corpse will activate the quest "Forbidden Legend" if the Dragonborn has not already read Lost Legends or a Writ of Sealing.
- After completing the quest, the Dragonborn may offer one of the other college students to become a follower.
Bugs[]
|
This section contains bugs related to Under Saarthal. Before adding a bug to this list, consider the following:
|
| Click to see the list of bugs encountered |
|---|
|
Appearances[]
| College of Winterhold Quests | |
|---|---|
| Main Quest | |
| Side Quests | |
| Master Spell Quests | |
| Radiant Quests | |
| Other Quests | |